

Recipe
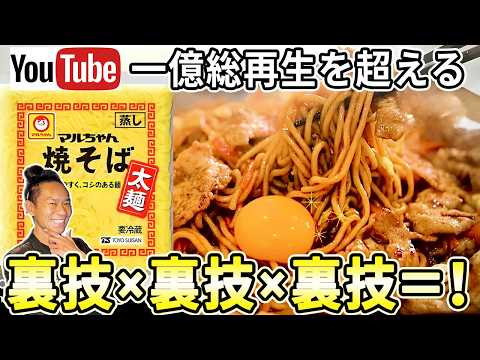
[Kanto vs. Kansai] Hack After Hack! Yakisoba Becomes Delicious When You Throw Away the Package Recipe
Ingredients
- Yakisobanoodles (thick) or Maruchan Seimen: 150g
- Pre-cutmixed vegetables: 1/2 pack
- Beefbelly (or sliced pork): 100g
- Negionion (white leek): 1/2
- Garlicchives: to taste
- Gratedgarlic: 1 tsp
- Pepper:to taste
- Bakingsoda: about 2 pinches
- Potatostarch: 1 tsp
- Riceoil: 1 tbsp
- Oystersoy sauce: 2 tbsp
- Chickenbouillon powder: a pinch
- Water:4 tbsp
- Sake:2 tbsp
- Yakisobasauce: 2 tbsp
- Water:2 tbsp
- Sesameoil: 1 tsp
- Lemonjuice: 1/2 tbsp (optional)
- Rawegg: to taste (for dipping)
About "Kansai-Style & Kanto-Style Yakisoba"
Introducing two yakisoba recipes: Kansai-style and Kanto-style. The keys to deliciousness are moisture control, heat control, and umami synergy. Prep the noodles by washing off oxidized oil and seasoning with oyster soy sauce, tenderize the meat with baking soda and potato starch, and blanch then steam-fry the vegetables. Also features a sukiyaki-style twist where you dip the noodles in raw egg.
Introduction to 予約7年待ち「肉の鬼才」森田隼人の料理研究所 →
Tips for Making "Kansai-Style & Kanto-Style Yakisoba"
-
Prep
- Blanch noodles in boiling water to thoroughly remove oxidized preservation oil and odors.
-
Prep
- Pat meat dry with paper towels and coat with pepper, baking soda, and potato starch to keep it tender.
-
Prep
- Place vegetables in a strainer and quickly blanch with boiling water to enhance aroma and texture.
-
Heat control
- Cover and sear noodles for 2 minutes on each side to get a good char, allowing them to absorb vegetable broth later.
-
Seasoning
- Use oyster soy sauce as a base to boost umami 7 to 8 times through the synergy of glutamic and inosinic acids.
-
Seasoning
- Drizzle sesame oil at the end to add aroma and depth of flavor.
Ingredients for "Kansai-Style & Kanto-Style Yakisoba"
19 items* Tap ingredient names to find on Amazon
- Yakisobanoodles (thick) or Maruchan Seimen: 150g
- Pre-cutmixed vegetables: 1/2 pack
- Beefbelly (or sliced pork): 100g
- Negionion (white leek): 1/2
- Garlicchives: to taste
- Gratedgarlic: 1 tsp
- Pepper:to taste
- Bakingsoda: about 2 pinches
- Potatostarch: 1 tsp
- Riceoil: 1 tbsp
- Oystersoy sauce: 2 tbsp
- Chickenbouillon powder: a pinch
- Water:4 tbsp
- Sake:2 tbsp
- Yakisobasauce: 2 tbsp
- Water:2 tbsp
- Sesameoil: 1 tsp
- Lemonjuice: 1/2 tbsp (optional)
- Rawegg: to taste (for dipping)
How to Make "Kansai-Style & Kanto-Style Yakisoba"
- 1
[Kansai-Style Yakisoba]
- 2
Boil plenty of water over high heat
Prepare boiling water ahead of pan-cooking. This is needed to blanch the noodles and vegetables.
- 3
Pat the beef belly dry and season
Spread the beef belly thinly on paper towels, place another paper towel on top, and press to thoroughly wipe away excess moisture. Once dry, evenly sprinkle with pepper, 2 pinches of baking soda, and 1 tsp of potato starch, then place on a tray.
- 4
Blanch the vegetables in a strainer
Place the pre-cut vegetables in a strainer, quickly pour boiling water over them to blanch, drain well, and transfer to a separate bowl. This enhances their aroma and texture.
- 5
Blanch and season the noodles
Quickly blanch the yakisoba noodles in boiling water to wash off oxidized oil, then transfer the drained noodles to a bowl. Toss with 1 tbsp of rice oil and 2 tbsp of oyster soy sauce.
- 6
Sear the noodles in a pan
Spread the noodles in a cold pan and heat over medium heat. When you hear a crackling sound, cover with a lid and cook for 2 minutes. Flip, cover again, and cook the other side for 2 minutes. Once nicely browned, transfer the noodles to a bowl to rest.
- 7
Cut the negi onion with slits
Cut the negi onion into thumb-sized pieces, and make a light slit down the middle so the inner layers don't pop out.
- 8
Steam-fry the vegetables and meat
Add the negi onion, blanched vegetables, and garlic chives to a pan preheated over medium heat. Add a pinch of chicken bouillon powder, 4 tbsp of water, and 2 tbsp of sake, cover, and steam-fry for 1 minute.
- 9
Stir-fry the meat
Once steamed, push the vegetables to the side. In the cleared space, add 1 tsp of grated garlic and the prepped beef belly, and stir-fry just the meat. Cook until the meat completely changes color.
- 10
Combine and stir-fry noodles, vegetables, and meat
Return the rested noodles to the pan, add 2 tbsp of yakisoba sauce and 2 tbsp of water, and stir-fry until everything is well combined.
- 11
Finish with sesame oil
Drizzle 1 tsp of sesame oil at the end to finish. Dip in raw egg to enjoy if desired.
- 12
[Kanto-Style Yakisoba]
- 13
Pat the pork belly dry and season
Pat the pork belly dry with paper towels in the same way, then prep by coating with pepper, baking soda, and 1 tsp of potato starch.
- 14
Blanch and season the noodles
Blanch the Maruchan yakisoba noodles in boiling water to wash off oxidized oil, then toss with 1 tbsp of rice oil and 2 tbsp of oyster soy sauce.
- 15
Sear the noodles in a pan
Heat a pan over medium heat, add the noodles, and sear them uncovered until crispy. Once both sides are browned, remove them from the pan. Add more rice oil while searing if needed.
- 16
Steam-fry the vegetables and meat
Add the negi onion, blanched vegetables, garlic chives, a pinch of chicken bouillon powder, 4 tbsp of water, and 2 tbsp of sake to a preheated pan, cover, and steam-fry for 1 minute.
- 17
Stir-fry the pork belly
Once steamed, push the vegetables to the side, add the pork belly, and stir-fry. Cook until the meat is fully cooked through.
- 18
Return the noodles and stir-fry
Return the seared noodles to the pan, add 2 tbsp of yakisoba sauce and 2 tbsp of water (instead of the included powder sauce packet), and stir-fry everything together.
- 19
Finish with sesame oil
Add 1 tsp of sesame oil at the end to finish.
Food Science
An umami synergy is created when the inosinic acid in the meat combines with glutamic acid and other umami compounds found in the oyster soy sauce, yakisoba sauce, and chicken bouillon. Additionally, using potato starch locks in the meat's moisture, achieving precise moisture control for a juicy finish. The acidity from the finishing lemon juice tightens the overall flavor profile, balancing the five basic tastes.
Detailed Commentary on "Kansai-Style & Kanto-Style Yakisoba"
* Content organized by topics from the video.
Kansai vs. Kanto & 3 Reasons Home Yakisoba Fails
Kansai has a strong teppanyaki (griddle cooking) culture, where noodles are seared to evaporate moisture, making thick noodles the standard. On the other hand, Kanto favors pork and prefers thin noodles. According to Chef Morita, there are three reasons why homemade yakisoba fails. First is excess moisture. Commercial yakisoba noodles are coated in oil, which prevents the starch from emulsifying like pasta; too much water makes them soggy. Second is following the package instructions blindly. You need to properly sear the vegetables and noodles to control the moisture. Third is the lack of umami synergy. Adding glutamic acid to the inosinic acid found in the sauce and meat boosts the umami flavor seven to eightfold through amino acid synergy. To supply this extra umami, we use oyster soy sauce as our secret ingredient.
Kansai Yakisoba Ingredients & Pro Prep Tips
The ingredients needed are 150g of thick yakisoba noodles, half a pack of pre-cut mixed vegetables, 100g of beef belly, half a negi onion, and 1 tsp of grated garlic. When making this at home, using plenty of meat makes it luxurious and delicious. First, since thinly sliced meat easily releases moisture, spread it out on paper towels and press from above to thoroughly absorb excess moisture, which is the source of gamey odors. Once dry, sprinkle with pepper, a pinch of baking soda to keep the meat tender, and 1 tsp of potato starch to lock in moisture and coat the surface. Do not use salt or sake here, as they draw out the meat juices. Place the vegetables in a strainer and quickly blanch them with boiling water to dramatically enhance their aroma and texture.
Pro Techniques for Blanching and Searing Noodles
Prepping the noodles is the single most important factor that determines the quality of your yakisoba. Since commercial packaged noodles are coated in oxidized oil for preservation, quickly blanch them in boiling water to thoroughly wash away the oil and its distinct odor. After blanching, toss the noodles with 1 tbsp of rice oil to keep them from sticking, and mix in 2 tbsp of oyster soy sauce to add a base layer of seasoning that compensates for the lack of richness and acidity in standard yakisoba sauce. Next, spread the noodles in a cold pan and heat over medium heat. When you hear a crackling sound, cover with a lid and cook for 2 minutes, then flip and cook the other side covered for another 2 minutes. This solid sear plays a crucial role in absorbing the vegetable broth later. Meanwhile, cut the negi onion into thumb-sized pieces and make a light slit down the middle so the inner layers don't pop out.
Finishing Kansai Yakisoba & Sukiyaki-Style Twist
Add the negi onion, blanched vegetables, and garlic chives to a preheated pan. Add a pinch of chicken bouillon powder, 4 tbsp of water, and 2 tbsp of sake, cover, and steam-fry for 1 minute. Once steamed, push the vegetables to the side. In the cleared space, add 1 tsp of garlic and the prepped beef belly, and stir-fry just the meat. Once the meat changes color, add the seared noodles, 2 tbsp of yakisoba sauce, and 2 tbsp of water, and stir-fry everything together rapidly. Finish by drizzling 1 tsp of sesame oil. During the tasting, the staff raved about the incredibly tender meat and the chewy noodles that absorbed the broth. Furthermore, trying a sukiyaki-style twist by dipping the noodles in raw egg sent the chef into excitement over its rich, luxurious taste, exclaiming, 'Delicious!'
Cooking Kanto Yakisoba: Pro Maruchan Hacks
Next, we move on to cooking the Kanto-style yakisoba using Maruchan yakisoba noodles, which are highly familiar in the Kanto region. For Kanto-style, 100g of pork belly and thin noodles are an absolute match. Just like the Kansai style, pat the pork belly dry with paper towels, then prep by coating with pepper, baking soda, and 1 tsp of potato starch. Blanch the noodles in boiling water to remove the oxidized oil, then toss with 1 tbsp of rice oil and 2 tbsp of oyster soy sauce. Since Maruchan noodles have a firm, chewy texture, sear them directly in the pan uncovered until crispy. If the noodles stick slightly, add a bit of rice oil while searing both sides to a beautiful golden brown, then remove them from the pan. Blanch the vegetables to prepare them in the same way.
Kanto Yakisoba Finish & Kanto vs. Kansai Summary
Add the negi onion, vegetables, garlic chives, a pinch of chicken bouillon powder, 4 tbsp of water, and 2 tbsp of sake to a preheated pan, cover, and steam-fry for 1 minute. Once steamed, push them to the side, add the pork belly, and stir-fry. Once the meat is cooked through, return the noodles to the pan. Add 2 tbsp of yakisoba sauce and 2 tbsp of water (instead of the included powder sauce packet) and stir-fry everything together rapidly. Finish by adding 1 tsp of sesame oil. Upon tasting, the thin noodles and tender pork belly cling beautifully to the sauce, creating a nostalgic yet refined homemade flavor. In summary, the chef concludes that the Kansai style (thick noodles) from the teppanyaki culture is best for highlighting the tender texture of beef, while the Kanto style (thin noodles) is perfect for bringing out the savory flavor of pork.
About 予約7年待ち「肉の鬼才」森田隼人の料理研究所
予約7年待ち「肉の鬼才」森田隼人の料理研究所
17.1万人 subscribers ・ 和牛・肉料理
* Opens YouTube channel
* Subscriber count is as of article creation and may differ from the current number.
