

Recipe
How to Make Shiso Miso: Better Than Store-Bought & Perfect for Onigiri
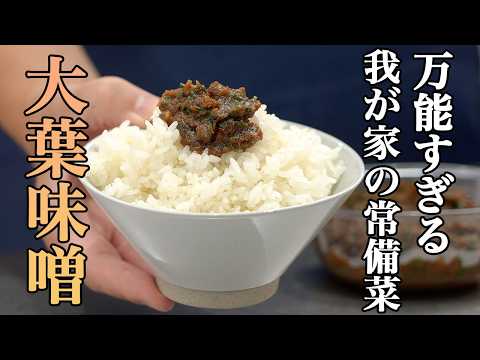
Ingredients
- 40shiso (perilla) leaves
- 6tbsp miso (120g)
- 1tbsp sesame oil
- 4tbsp sake
- 4tbsp mirin
- 1tbsp sugar
- 4tbsp toasted ground sesame seeds
- 2cloves garlic (grated)
About "Shiso Miso (Sweet & Savory Perilla Leaf Paste)"
This premium shiso miso recipe uses 40 fresh perilla leaves and a unique "pan-searing" technique to achieve a rich, smoky depth that easily beats store-bought versions. By blending two types of miso with grated garlic and toasted ground sesame seeds, it creates a deeply savory flavor without needing dashi powder. Tossing the shiso in the residual heat after turning off the stove preserves its vibrant green color and fresh aroma. Perfect as an onigiri filling or a dip for fresh vegetables like cucumbers and cabbage. Covering the container with a paper towel before sealing helps absorb steam, keeping it fresh for longer in the fridge.
Tips for Making "Shiso Miso (Sweet & Savory Perilla Leaf Paste)"
-
Ingredients
- Blending two types of miso layers their unique qualities for a deeper flavor, though using just one type works too.
-
Prep
- Grating the garlic instead of mincing it ensures a smooth mouthfeel that blends seamlessly with the miso.
-
Prep
- Thoroughly shake off excess water after washing the shiso. Any remaining moisture will make the paste watery.
-
Prep
- Slice the shiso smoothly by pulling the knife toward you. Avoid over-chopping to keep the aroma locked in.
-
Heat Control
- Grated garlic burns easily on its own, so add it to the pan with the miso before turning on the heat.
-
Cooking Tips
- Searing the miso thinly in the pan is key to achieving a rich, roasted flavor. Flip and stir once seared, taking care not to burn it.
-
Seasoning
- The sweetness can be adjusted later. Start with 1 tbsp of sugar as a base and adjust to your preference.
-
Reduction
- Since shiso releases moisture, reduce the mixture until it feels slightly too firm. This makes it easier to use as a filling and extends shelf life.
-
Finishing
- Fold in the shiso using only residual heat to preserve its vibrant green color and fresh aroma. Briefly boil at the end to evaporate surface moisture.
-
Storage
- Drape a paper towel over the container before sealing to absorb steam. Once cooled, remove the paper towel and refrigerate to extend shelf life.
Ingredients for "Shiso Miso (Sweet & Savory Perilla Leaf Paste)"
8 items* Tap ingredient names to find on Amazon
How to Make "Shiso Miso (Sweet & Savory Perilla Leaf Paste)"
- 1
[Make the seasoning mixture] In a bowl, combine 4 tbsp sake, 4 tbsp mirin, 1 tbsp sugar, 4 tbsp toasted ground sesame seeds, and 120g miso, then mix lightly.
- 2
[Prep the garlic] Cut off the root ends of 2 garlic cloves, slice them in half lengthwise to remove the germs, and finely grate them.
- 3
[Prep the shiso] Gently wash 40 shiso leaves in a bowl of water and shake off the excess moisture thoroughly. Cut off the stems, slice them lengthwise into julienne strips, then rotate and finely mince them. Slice smoothly by pulling the knife toward you, avoiding bruising or over-chopping.
- 4
[Sear the miso] Add 1 tbsp sesame oil to a pan, then add the miso and grated garlic before turning on the heat. Heat over medium-low and mix until the sesame oil is fully incorporated into the miso.
- 5
[Develop the sear] Spread the miso thinly across the pan. Once it gets slightly charred, flip and stir. Repeat this process, being careful not to burn it, until the miso turns a deep brown and releases a rich, roasted aroma.
- 6
[Simmer and reduce] Turn off the heat, add all of the prepared seasoning mixture, and turn the heat back to low. Stir well to dissolve the miso into the liquid, and simmer until the alcohol evaporates and the mixture becomes thick and paste-like. Since the shiso will release some moisture later, reduce it until it feels slightly firmer than your desired final texture.
- 7
[Add the shiso] Turn off the heat completely, add all the minced shiso at once, and toss quickly to combine using only the residual heat.
- 8
[Finish] Turn the heat back on for just a brief moment to bring it to a quick boil, evaporating any excess moisture from the shiso.
- 9
[Storage] To cool, place a paper towel loosely over the airtight container before closing the lid. Once cooled, remove the paper towel and store in the refrigerator.
Detailed Commentary on "Shiso Miso (Sweet & Savory Perilla Leaf Paste)"
* Content organized by topics from the video.
Golden Ratio for Deep, Rich Flavor
Today, we are making "Shiso Miso," packed with fresh perilla leaves and perfect as an onigiri filling. Let's start by preparing the seasoning mixture. You'll need 120g (about 6 tbsp) of miso. I'm blending two different types of miso in equal parts today, but using just one type is perfectly fine. Blending two types layers their unique characteristics, creating a deeper flavor profile. In a bowl, combine 4 tbsp sake, 4 tbsp mirin, 1 tbsp sugar, and 4 tbsp toasted ground sesame seeds. Adding plenty of ground sesame seeds at this stage gives the final paste a rich depth and adds nice body. You can always adjust the sweetness later, so let's start with 1 tbsp of sugar as our base. Give it a light mix, and your seasoning mixture is ready.
Prepping Garlic for a Smooth Texture
Next, let's prep 2 cloves of garlic (about 15g). Cut off the root ends, slice them in half lengthwise, and remove the green germs. Here is a great tip for smooth cooking: always bring out your cutting board last. Instead of cluttering your workspace with a cutting board from the start, prepping your seasonings first and using the board at the very end maximizes kitchen space and makes cleanup much easier. Finely grate the prepped garlic. We are grating it instead of mincing it to ensure a smooth mouthfeel that blends seamlessly with the miso. Adding garlic to the miso coaxes out a deep, savory umami flavor without needing any dashi powder.
Maximizing the Aroma of 40 Shiso Leaves
For our star ingredient, we are using a generous 40 shiso leaves. You might think 40 leaves is too much, but they shrink dramatically once heated, making it the perfect amount for this volume of miso. Shiso leaves are usually pre-washed before packaging, so a gentle rinse in a bowl of water is plenty. After washing, it is crucial to shake off all excess water. Any remaining droplets will make the final miso paste watery. Once dry, cut off the stems, slice them lengthwise into julienne strips, then rotate and finely mince them. Shiso releases its wonderful aroma from the cut edges, so slice smoothly by pulling the knife toward you rather than chopping repeatedly, which keeps the fragrance locked in.
Elevating Flavor with Pan-Seared Miso
Add 1 tbsp of sesame oil to your pan, and add the miso and grated garlic before turning on the heat. Grated garlic burns easily on its own, so adding it together with the miso is key. Heat over medium-low and mix until the sesame oil is fully incorporated. Now, here is the secret step that elevates this dish far beyond store-bought versions: we are going to spread the miso thinly across the pan to intentionally sear it. Be careful not to burn it; once it gets slightly charred, flip and stir, repeating the process. This extra step creates a smoky, roasted aroma—reminiscent of grilled onigiri—and a deep richness. Once the moisture evaporates, the color deepens to a rich brown, and a savory aroma fills the air, your seared miso base is ready.
Simmering to Concentrate the Umami
Once the miso is beautifully seared, turn off the heat. Add all of the prepared seasoning mixture and turn the heat back to low. Stir well to dissolve the miso into the liquid, and simmer to reduce. We want to cook off the alcohol from the sake and mirin and slowly evaporate the moisture until it reaches your desired thickness. Personally, I recommend reducing it to a firmer paste. This prevents the miso from leaking out when wrapped in onigiri and extends its shelf life. Keep in mind that the shiso will release a bit of moisture later, so stir constantly with a silicone spatula to prevent the edges from burning, and reduce it until it feels slightly too firm.
Locking in the Fresh Shiso Aroma
Once the miso has reached the perfect thickness, turn off the heat completely. Add all of the minced shiso at once. Overheating shiso dulls its beautiful green color and destroys its fresh aroma. The professional secret is to use only the residual heat of the turned-off pan to quickly fold the shiso into the miso. Once evenly mixed, turn the heat back on for just a split second to bring it to a brief boil. This evaporates any remaining moisture on the surface of the shiso, improving shelf life. As the refreshing scent of shiso blooms and blends perfectly with the savory, roasted miso, your exquisite Shiso Miso is complete.
Flavor Comparison and Storage Hacks
Tasting the finished Shiso Miso, the refreshing aroma of shiso bursts in your mouth, followed by the rich depth of the seared miso and savory garlic—it is absolutely irresistible with hot rice! For comparison, I also made a batch of shiso miso by simply mixing the ingredients without searing. The difference was night and day, starting with the color; the seared version had an overwhelmingly superior depth of flavor and aroma. Finally, here is a storage hack to make your homemade shiso miso last longer. If you seal the container while it is still warm, condensation will form on the lid and drip back onto the miso, causing it to spoil faster. Instead, drape a paper towel loosely over the container before closing the lid. The paper towel absorbs the excess steam. Once cooled, remove the paper towel and store it in the fridge to keep it fresh for much longer.
About 食事処さくらの料理教室

食事処さくらの料理教室
101万人 subscribers ・ 家庭料理
* Opens YouTube channel
* Subscriber count is as of article creation and may differ from the current number.
