

Recipe
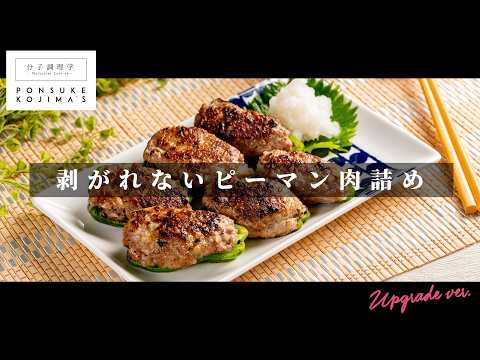
Never Fall Apart! Maximum Juiciness: Stuffed Bell Peppers Recipe
Ingredients
- 300gground meat mix (beef and pork)
- 4green bell peppers
- 1/4onion
- 100mlpanko breadcrumbs
- 1egg
- 2gsalt
- Blackpepper to taste
About "Stuffed Bell Peppers"
This recipe solves the common problem of meat filling separating from the peppers during cooking using molecular gastronomy. By scoring the outer skin of the bell peppers with a fork, we reduce their tissue density, which, combined with emulsified meat, dramatically improves adhesion. Low-temperature cooking using aluminum foil locks the juices inside, resulting in incredibly fluffy, juicy, and perfect stuffed bell peppers.
Introduction to こじまぽん助【分子調理学研究家】 →
Video Timestamps
Tips for Making "Stuffed Bell Peppers"
-
Prep
- Scoring the skin side of the peppers vertically with a fork prevents warping during cooking and keeps the meat from separating.
-
Filling
- Kneading half the meat with salt and ice to emulsify it first, then lightly mixing in the rest, balances strong adhesion with a meaty texture.
-
Heat Control
- Sealing with foil and cooking slowly on medium-low allows the meat proteins to solidify gently around 60°C (140°F), locking in the juices.
-
Searing
- Cook without oil by utilizing the meat's own fat, and use foil to let steam escape while promoting a savory sear via the Maillard reaction.
Ingredients for "Stuffed Bell Peppers"
7 items* Tap ingredient names to find on Amazon
How to Make "Stuffed Bell Peppers"
- 1
Prepping the Peppers
Cut 4 green bell peppers in half lengthwise and remove the ribs and seeds. As a crucial tip, use a fork to score the skin side (outside) of the peppers vertically in several places. The skin of a bell pepper has a high tissue density, causing it to shrink and warp during cooking, which pushes the meat out. Scoring it with a fork reduces this density and prevents warping.
- 2
Mincing the Onion
Finely mince 1/4 onion.
- 3
Emulsifying Half the Meat
Place half of the ground meat mix (150g out of 300g) in a bowl, and season generously with 2g of salt and black pepper. Add ice to keep the meat cold while kneading it by squeezing it through your hands. This breaks down the meat fibers, creating an 'emulsified state' where moisture and fat bind together, making the mixture sticky. Since the binding strength drops if the meat temperature rises above 20°C (68°F), it is crucial to work while keeping it cold with ice. Remove the ice once it becomes sufficiently sticky.
- 4
Adding Onion, Panko, and Egg
Add the minced 1/4 onion, 100ml panko breadcrumbs, and 1 egg to the emulsified meat, and mix lightly by hand.
- 5
Adding the Remaining Meat
Add the remaining 150g of ground meat to the bowl and mix lightly for only about 10 seconds. The first batch of thoroughly kneaded meat acts as a 'binder,' while the meat added now retains a 'meaty texture,' resulting in a perfect filling that is both fluffy and juicy.
- 6
Stuffing the Peppers
Stuff the prepared filling into the green peppers. The key here is to pack it in tightly without leaving any gaps. There is no need to dust the inside of the peppers with flour; the fork scores and the meat's binding power are more than enough to keep them together.
- 7
Placing in the Pan
Arrange the stuffed peppers meat-side down in a cold frying pan. There is no need to grease the pan with oil. Plenty of fat will render from the meat itself, which will be used to cook them.
- 8
Covering with Foil and Cooking
Cover the frying pan with aluminum foil, tucking the edges tightly inward to seal it. Start heating on high, and as soon as you hear a crackling sound, reduce the heat to medium-low and cook for 4 minutes. Rapid heating on high heat causes the meat proteins to contract and squeeze out the juices, but cooking slowly at a low temperature around 60°C (140°F)—where proteins solidify—locks the juices inside.
- 9
Searing the Pepper Side
After 4 minutes, remove the foil and flip the peppers over. The meat side will have a beautiful sear, with almost no juices lost to the pan. Now, cook the pepper side. Searing the peppers well triggers the Maillard reaction, bringing out a savory aroma and rich umami. Cover with foil again and cook on medium-low for another 4 minutes.
- 10
Final Sear
After that, monitor and cook in 1-minute increments for a total cooking time of about 10 minutes. At the very end, turn up the heat slightly to evaporate excess moisture from the peppers, leaving them with a crisp texture and a fragrant finish.
- 11
Resting
Wrap the cooked stuffed peppers in aluminum foil and let them rest for about 5 minutes.
Food Science
Kneading ground meat with salt dissolves salt-soluble proteins, which form a mesh-like structure that traps the juices. Combined with the water-retaining properties of panko and egg, this enhances juiciness. Additionally, the pleasant bitterness of the green peppers combined with the umami of the meat and the sweetness of the onion balances the five basic tastes, creating a satisfying flavor you won't tire of.
Detailed Commentary on "Stuffed Bell Peppers"
* Content organized by topics from the video.
The Secret to Stuffed Peppers That Don't Separate
Today's theme is stuffed bell peppers, a home-cooking classic that often suffers from the eternal struggle of the meat separating from the pepper. From the perspective of molecular gastronomy, we will show you how to solve this problem without using any flour or starch. Furthermore, we will explain professional techniques to not only keep them together but also achieve maximum juiciness and a satisfying meaty texture in every bite. The ingredients are exactly what you normally use, and no special tools are required. Once you understand the science behind the cooking, anyone can make perfect, delicious stuffed bell peppers without fail. At the end of the video, we also share some background on how this recipe was developed, so please enjoy it to the end!
Pepper Prep and the Fork Trick
First, let's prep the 4 green bell peppers. When cutting them in half, aiming your knife at the indented parts makes it easier to cleanly separate and remove the ribs. Since we want to pack in plenty of meat, make sure to thoroughly remove the ribs and seeds. Now, here is the most crucial trick to prevent separation: use a fork to score the skin side of the peppers vertically in several places. Because peppers are plants, the outer skin is denser than the inside to protect them from external threats. Consequently, when heated, the outer skin shrinks intensely and warps, pushing the meat out. Scoring the outside with a fork reduces this density, preventing the warping during cooking.
Emulsifying for the Perfect Texture
Next, we make the meat filling using 300g of ground meat mix. First, put half of it (150g) in a bowl, season generously with 2g of salt and pepper, and knead by squeezing it through your hands. This breaks down the meat fibers to create an emulsified state where moisture and fat bind together. Since the binding strength drops if the meat's temperature exceeds 20°C (68°F), the trick is to knead it while keeping it cold with ice. Once it becomes sticky, remove the ice and add 1/4 raw onion, 100ml panko breadcrumbs, and 1 egg. Now, add the remaining 150g of ground meat and mix lightly for only about 10 seconds. The first batch of thoroughly kneaded meat acts as a 'binder,' while the newly added meat retains its 'meaty texture,' creating a fluffy yet juicy filling.
Shaping and Placing in the Pan
Now, stuff the prepared filling into the peppers. The key here is to pack it in tightly without leaving any gaps. There is no need to dust the inside of the peppers with flour; the fork scores and the meat's binding power are more than enough to keep them together. Once shaped, arrange them meat-side down directly in a cold frying pan. You do not need to add oil to the pan. Plenty of fat will render from the meat itself, which we will use to cook them. Once arranged, we move on to the cooking process. Unlike hamburgers, there is no need to shape patties—you just stuff them into the pepper cups, making this an incredibly easy dish for beginners.
The Magic of Foil and Low Heat
For the cooking process, cover the frying pan with aluminum foil, tucking the edges tightly inward to seal it. Start on high heat, and as soon as you hear a crackling sound, reduce the heat to medium-low and cook for 4 minutes. Rapid heating on high heat causes the meat proteins to contract and squeeze out the juices, but cooking slowly at a low temperature around 60°C (140°F)—where proteins solidify—locks the juices inside. Also, using aluminum foil instead of a standard lid traps heat while allowing excess steam to escape. A lid causes condensation to drip back into the pan, lowering the temperature and hindering the Maillard reaction that creates a savory sear, but foil eliminates this issue.
Searing Both Sides to Perfection
After 4 minutes, remove the foil and flip the peppers over. The meat side will have a beautiful sear, with almost no juices lost to the pan. Now, cook the pepper side. Searing the peppers well triggers the Maillard reaction, bringing out a savory aroma and rich umami. Cover with foil again and cook on medium-low for 4 minutes, then monitor and cook in 1-minute increments for a total cooking time of about 10 minutes. At the very end, turn up the heat slightly to evaporate excess moisture from the peppers, leaving them with a crisp texture and a fragrant finish. Even after cooking, the meat will not separate at all, remaining perfectly bonded to the peppers.
Enjoying Juicy Peppers with Grated Daikon
Plate the cooked stuffed peppers. Instead of ketchup or sauce, we will enjoy them refreshingly with grated daikon radish and soy sauce. Thanks to the low-temperature cooking, an incredible amount of juice is locked inside these stuffed peppers. Rather than pairing them with a heavy sauce, the clean flavor of grated daikon maximizes and highlights the juicy, savory taste of the meat. With one bite, the trapped juices burst out, and the contrast between the crisp pepper, the fluffy filling, and the meaty texture harmonizes perfectly in your mouth. Please try this scientifically backed, foolproof recipe at home!
About こじまぽん助【分子調理学研究家】
こじまぽん助【分子調理学研究家】
15.6万人 subscribers ・ 家庭料理
* Opens YouTube channel
* Subscriber count is as of article creation and may differ from the current number.
