
Recipe
What is Chochin Yakitori? How to Prep and Cook This Rare Cut!
Ingredients
- Tamahimo(unhatched chicken eggs and ovaries) 1 kg
- Saltto taste
- Soysauce to taste
- Oilas needed (for grilling after skewering)
About "Chochin Yakitori (Chicken Ovaries and Unhatched Eggs)"
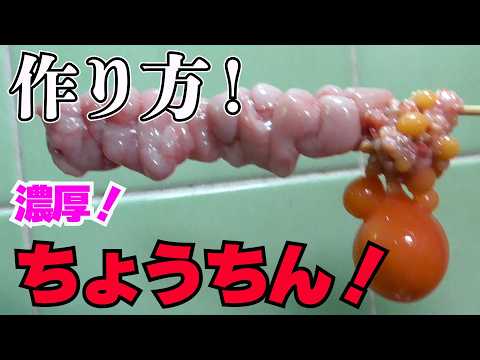
This recipe features Chochin yakitori made from chicken tamahimo (ovaries and fallopian tubes). The tama (unhatched egg yolk) offers a rich, creamy flavor, while the himo (tube) has a chewy, offal-like texture. Key steps include careful prep work—such as thorough washing, removing blood clots, and peeling the outer membrane—and skewering techniques to prevent the yolks from bursting. Seasoned with salt during grilling and finished with a brush of soy sauce.
Introduction to ケン爺ホルモン焼きチャンネル →
Tips for Making "Chochin Yakitori (Chicken Ovaries and Unhatched Eggs)"
-
Prep
- Wash thoroughly until the water runs clear, and completely remove blood clots and liver bits.
-
Prep
- Peel the thin membrane off the tubes and flush the insides with water to remove all impurities.
-
Skewering
- Position the delicate yolks closer to the handle, twisting and wrapping them securely onto the skewer.
-
Heat control
- Grill slowly to prevent the yolks from bursting, keeping them away from direct, intense heat.
-
Seasoning
- Season with salt during grilling, and brush with soy sauce at the end to enhance the aroma.
Ingredients for "Chochin Yakitori (Chicken Ovaries and Unhatched Eggs)"
4 items* Tap ingredient names to find on Amazon
How to Make "Chochin Yakitori (Chicken Ovaries and Unhatched Eggs)"
- 1
Washing the Tamahimo
Fill a bowl with water and gently wash the tamahimo to remove surface impurities and off-flavors. Change the water 2 to 3 times until it runs clear, then drain in a colander.
- 2
Separating the Yolks and Tubes
Spread the washed tamahimo on a cutting board. Use a knife to separate the 'tama' (unhatched egg yolks) from the 'himo' (fallopian tubes).
- 3
Removing the Liver and Blood Clots
Cut off the small liver-like bits attached to the ends of the tubes. For the yolks, use the tip of your knife to carefully remove any red blood clots connected to the ovary.
- 4
Peeling the Membrane from the Tubes
Gently scrape and peel off the thin outer membrane from the surface of the tubes using a knife. Removing this membrane makes skewering easier and yields a tender texture.
- 5
Cutting and Cleaning the Inside of the Tubes
Cut the peeled tubes into pieces about 10 cm (4 inches) long. Open one end of each tube with your fingers and run tap water directly through it to thoroughly flush out the inside. Since the tubes are hollow, impurities can get trapped inside, so clean them carefully.
- 6
Skewering the Yolks
The yolks are extremely delicate and burst easily, so position them closer to the handle of the skewer rather than the tip. Thread the skewer through the cluster of tiny eggs, twist it, and pierce through once more from bottom to top to secure them. This creates the hanging 'lantern' shape.
- 7
Skewering the Tubes
Skewer the cut tubes so they wrap around above the yolk. Firmly pierce one end of a tube, then fold and thread it back and forth in an accordion pattern to create volume. Aim for 1 yolk and 2 tube pieces per skewer.
- 8
Pre-Grilling Prep
Thoroughly brush the grill grate with oil beforehand to prevent the meat from sticking.
- 9
Grilling
When placing the skewers on the grill, position the delicate yolks on the cooler side (closer to you) to avoid direct, intense heat. Grill slowly and gently to prevent the yolks from bursting, turning them to cook both sides evenly until fragrant.
- 10
Seasoning and Finishing
Lightly sprinkle salt over the skewers while grilling. At the very end, brush with soy sauce to enhance the aroma. They are ready when the yolks are soft-boiled and wonderfully runny.
Food Science
The rare chicken cut known as 'chochin' consists of kinkan (unhatched egg yolk) and himo (fallopian tube and ovary). Heating causes the proteins in the kinkan to coagulate, creating a rich, creamy depth of flavor. Additionally, during the grilling process, the proteins in the meat and the soy sauce undergo a thermal reaction (Maillard reaction), forming a savory, aromatic crust. The deliciousness is further enhanced by the synergistic umami effect between the natural inosinic acid in the chicken and the glutamic acid in the soy sauce.
Detailed Commentary on "Chochin Yakitori (Chicken Ovaries and Unhatched Eggs)"
* Content organized by topics from the video.
Making Chochin from Tamahimo: Start with a Gentle Wash
We are using the rare cut tamahimo to make the popular yakitori menu item, Chochin. Tamahimo refers to the combination of chicken ovaries/fallopian tubes (himo) and unhatched eggs (tama). It is called chochin (lantern) because the skewered presentation resembles a traditional Japanese paper lantern. Today, we will grill this fresh tamahimo on a home tabletop gas grill, the Aburiya. Before cooking, we start by gently washing the ingredients in a bowl of water to remove surface impurities and off-flavors. Lightly wash them while changing the water 2 to 3 times until it runs mostly clear, then drain in a colander. This simple step eliminates any gamey odor and ensures a clean, delicious finish.
Separating the Yolks and Prepping the Parts
Spread the washed tamahimo on a cutting board to separate the different parts. First, use a knife to cut the tama (unhatched egg yolks) away from the himo (tubes). At the base of the tama, there is a cluster of tiny unhatched eggs; when skewered, this cluster creates the classic chochin look. Next, cut off the small, liver-like liver bits attached to the ends of the himo. Since blood clots can accumulate here, use the tip of your knife to carefully remove them. You don't need to get every single speck, but cleaning off as much blood as possible eliminates off-flavors and dramatically improves the taste when grilled.
Peeling the Membrane and Cleaning the Tubes
Next, we move on to prepping the himo (fallopian tubes). There is a thin outer membrane (thin skin) on the surface of the himo, so gently scrape and peel it off with a knife. Removing this thin skin makes the tubes much easier to skewer and gives them a tender texture when eaten. Once the membrane is removed, cut the himo into pieces about 10 cm (4 inches) long. Because the himo is a hollow tube, impurities can sometimes remain inside. Open one end of each cut piece with your fingers and run tap water directly through it to thoroughly flush out the interior. Doing this for all the pieces completes the prep work perfectly.
Pro Skewering Techniques for the Perfect Shape
With the prep work done, it's time for the fun part: skewering. Because the tama (yolks) are extremely delicate and burst easily, the key is to position them closer to the handle of the skewer rather than the tip. First, thread the skewer through the cluster of tiny eggs, twist it, and pierce through once more from bottom to top to secure them. This creates the hanging look of a chochin lantern. Next, skewer the cut himo so they wrap snugly above the yolk. Firmly pierce one end of the himo, then fold and thread it back and forth in an accordion pattern to build up volume. This beautiful skewering technique ensures even heat distribution during grilling.
Grilling on the Aburiya: Salt & Soy Seasoning
Once skewered, we grill them using Iwatani's tabletop grill, the Aburiya. To prevent the meat from sticking, thoroughly brush the grate with oil beforehand. When arranging the skewers, the trick is to place the delicate tama on the cooler side (closer to you) so they aren't exposed to direct, intense heat. For seasoning, first sprinkle a light layer of salt over everything. Waiting for them to cook while sipping a cold beer is an absolute treat. Turn them regularly to grill both sides until fragrant, and finish by brushing on soy sauce to elevate the aroma. The result is an exquisite chochin with a perfectly runny, soft-boiled yolk.
About ケン爺ホルモン焼きチャンネル
ケン爺ホルモン焼きチャンネル
3,320人 subscribers ・ ホルモン焼き
* Opens YouTube channel
* Subscriber count is as of article creation and may differ from the current number.
