

Recipe
Sardine Flower Sashimi (Iwashi no Hanazukuri): Complete Guide
Ingredients
- 1Hokkaido sardine
- 1liter water
- 2tbsp salt
- Ice,as needed
- 1tbsp grain vinegar
About "Sardine Flower Sashimi (Iwashi no Hanazukuri)"
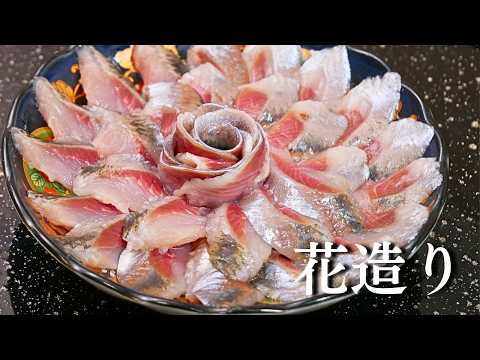
This is a high-end Edomae sushi dish featuring Hokkaido sardines. The small bones are carefully removed using the hand-filleting technique, and any fishy odor is eliminated with a salted ice water and vinegar bath. The skin is then peeled to beautifully preserve the silver sheen of the flesh. Finally, a flower is crafted in the center, creating a gorgeous, symmetrical presentation. Freshness is the life of this dish, making quick yet meticulous preparation essential.
Introduction to 蒼の鮨 sushi-chef ao →
Tips for Making "Sardine Flower Sashimi (Iwashi no Hanazukuri)"
-
Prep
- Sardines must be fresh. Quickly remove scales, head, and tail, then clean the viscera and bloodline.
-
Prep
- Clean the belly with a toothbrush to prevent the delicate flesh from tearing.
-
Prep
- Thoroughly wipe off moisture to make filleting easier and improve the final look.
-
Deboning
- Hand-filleting removes small bones efficiently. Always start pulling the bone from the tail side.
-
Odor Removal
- Soak in 1L water with 2 tbsp salt, 1 tbsp vinegar, and ice for 1 min to firm flesh and remove odor.
-
Peeling
- Peel skin gently from the back to preserve the silver sheen. Use a cloth for a better grip.
-
Plating
- Symmetrical plating is key. Align the tips of the fish pieces using the plate's rim as a guide.
-
Plating
- Roll thinly sliced fish with chopsticks for the center flower. If too thick, it won't roll well.
Ingredients for "Sardine Flower Sashimi (Iwashi no Hanazukuri)"
5 items* Tap ingredient names to find on Amazon
How to Make "Sardine Flower Sashimi (Iwashi no Hanazukuri)"
- 1
Quickly prep the scales, head, and tail
Remove the scales with a knife, then cut off the head and tail. Sardines are delicate, and handling them for too long degrades their quality. It is crucial to work quickly and finish this step in one go.
- 2
Remove the viscera
Since the belly is firm, slice it open with a knife and remove the viscera. Score the bloodline membrane as well, and check the condition of the viscera to assess freshness.
- 3
Wash with a toothbrush
Gently clean the inside of the belly using a toothbrush. Sardine flesh is very delicate, and washing it with anything harsh can cause the meat to tear.
- 4
Thoroughly wipe off moisture
Thoroughly wipe away all moisture, including inside the belly, using paper towels or a clean cloth. This step ensures the subsequent steps go smoothly and directly impacts the final flavor.
- 5
Remove the backbone by hand-filleting
Insert the knife up to the back, then trace along the backbone with your fingertips to peel the flesh away. Next, remove the bone starting from the tail side, taking care not to damage the flesh.
- 6
Shave off the rib bones
Finally, carefully shave off the rib bones. The trick to avoiding cutting into the flesh is to practice and get a feel for it.
- 7
Soak in salted ice water to remove odor
Soak the sardine for 1 minute in a salted ice water bath made with 1 liter of water, 2 tbsp of salt, 1 tbsp of grain vinegar, and ice. Osmotic pressure firms up the flesh and removes any fishy odor.
- 8
Wipe off moisture
Once removed from the salted ice water, thoroughly wipe off any moisture with a clean cloth or paper towel. Meticulous work directly leads to great flavor.
- 9
Peel the skin from the back side
Peel the sardine skin by hand, starting from the back side. Do not pull with brute force; instead, visually confirm that only the skin is peeling off as you proceed. If it is slippery, hold it down with a cloth.
- 10
Trim the belly side
Once all the skin is peeled, the belly side will look uneven, so trim it by inserting the knife from the skin side (the top). This makes the silver sheen stand out beautifully.
- 11
Plate with a consistent pattern
Using the rim of the plate as a guide, arrange the pieces so their tips align. Place the pieces so they overlap by about half, rotating the plate to keep the spacing consistent, and layer them in the center to form a clean circle.
- 12
Garnish the center with a flower
Slice the sardine thinly and arrange the pieces in a row, overlapping by half. Using chopsticks, roll them up from one end to form a flower, then place it in the center. If the center space is too tight, gently push the surrounding pieces outward.
Food Science
Soaking sardines in salted water draws out excess moisture and fishy odors through osmosis, firming up the flesh and concentrating its umami. Additionally, using grain vinegar in the finish neutralizes trimethylamine, the compound responsible for the fishy smell, effectively deodorizing it. The acid also gently denatures the surface proteins, moderately tightening the flesh to create an excellent texture.
Detailed Commentary on "Sardine Flower Sashimi (Iwashi no Hanazukuri)"
* Content organized by topics from the video.
Sardine Freshness and Fast Prep
We use sardines from Hokkaido. Freshness is the life of Sardine Flower Sashimi (Iwashi no Hanazukuri); if the quality degrades, the fish oxidizes and discolors, ruining its appearance. First, remove the scales with a knife and cut off the head. Since the belly of a sardine is firm, slice it open before removing the viscera. At this point, also score the bloodline membrane. Looking at the condition of the viscera tells you its freshness at a glance, but sardines do not keep well as they turn black after just a day. Cut off the tail at this stage too. Sardines are extremely delicate fish, so the longer you handle them, the more their quality deteriorates. The cutting board might look messy, but even in professional kitchens, speed is prioritized to clean the fish all at once. When cleaning the belly, you might find ovaries or white milt (testes), and comparing the differences is an interesting detail.
Toothbrush Cleaning and Thorough Drying
After the initial prep, move on to washing. When cleaning the inside of the belly, we highly recommend using a toothbrush specifically for sardines. Because sardine flesh is incredibly soft, washing it with a gentle tool like a toothbrush prevents tearing of the flesh. Once washed, immediately use paper towels or a cloth to thoroughly remove all moisture. If you try to fillet the fish while it is wet, the cutting board will get soaked, making it hard to handle, and excess water will seep into the flesh. Therefore, meticulously wiping away moisture—including inside the belly—is a crucial step to ensure the subsequent processes go smoothly and the dish turns out delicious.
The Hand-Filleting Technique for Sardines
Once dried, perform hand-filleting. First, make an incision with a knife up to the back side, and using that as a starting point, trace along the backbone with your fingertips to peel the flesh away. Next, remove the bone starting from the tail side, taking care not to damage the flesh. Sardines have many small bones, so cutting them with a knife leaves many bones behind in the meat. Thus, hand-filleting is the recommended technique for sardines as it allows you to remove more bones cleanly. Be sure to always start from the tail side, as starting from the head side will cause you to shave off too much meat. Finally, shave off the rib bones; the secret to doing this cleanly without wasting flesh is simply to practice and get a feel for it.
Salted Ice Water and Vinegar Odor Removal
After removing the bones, prep the sardine to eliminate any fishy odor. In a bowl, combine 1 liter of water and 2 tbsp of salt, then add ice to make salted ice water. To effectively neutralize odors, add about 1 tbsp of grain vinegar. Submerge the sardines in this bath for 1 minute. This step beautifully removes any remaining fishiness. Additionally, due to osmotic pressure, excess moisture is drawn out, firming up the flesh. After 1 minute, drain them in a colander and thoroughly wipe off the moisture with a clean cloth or paper towel. To enjoy delicious fish, taking the time to perform these extra steps meticulously is absolutely essential.
Careful Peeling to Keep the Silver Sheen
Next, peel the skin of the sardine. Peeling sardine skin is relatively easy since it is done by hand without tools, but there are tips to achieve a beautiful finish. As shown in the video, always peel the skin starting from the back side. If you pull with brute force, you risk tearing off a large portion of the flesh along with the skin, so proceed while visually confirming that only the skin is peeling. If the skin is slippery and hard to grip, holding the edge of the skin with a cloth or paper towel makes it easy to peel cleanly. This method helps preserve the beautiful silver layer near the skin on the flesh, dramatically improving the final presentation.
Symmetrical Plating for a Beautiful Look
Once all the skin is peeled, prepare for plating. Since the belly side of the sardine is uneven, first trim it straight to neaten the shape. When slicing, the key is to insert the knife from the skin side (the top). This ensures the beautiful silver layer is clearly visible, making the sashimi look delicious. The ultimate secret to a stunning presentation is symmetrical plating. Align the tips of the fish pieces using the rim of the plate as a guide. By following this rule, even if the pieces vary slightly in size, the overall presentation will look beautifully organized. Place the pieces so they overlap by about half, rotating the plate to keep the spacing consistent. Layer the center pieces in the same way to form a clean circle.
How to Make the Center Sashimi Flower
Finally, create the flower to decorate the center of the sashimi platter. It may look difficult at first, but it is easy once you get the hang of it. The most important point is to slice the sardine thinly. If you cut it too thick on your first try, the flower will not roll into a neat round shape and will splay open. Arrange the thinly sliced pieces in a row, overlapping by half. Slicing them thinly creates a delicate, detailed look resembling real petals. Once arranged, roll them up from one end using chopsticks. Place the rolled flower in the center of the platter to complete the gorgeous Sardine Flower Sashimi (Iwashi no Hanazukuri). If the center space is too narrow and the flower seems unstable, gently push the surrounding pieces outward to open up the center and insert the flower securely.
About 蒼の鮨 sushi-chef ao
蒼の鮨 sushi-chef ao
3.2万人 subscribers ・ 和食/寿司
* Opens YouTube channel
* Subscriber count is as of article creation and may differ from the current number.
