

Recipe
Table Ogino: Deboning a Quail with Chef Ogino
Ingredients
- 1quail
- 100gfarce (meat stuffing, pilaf, risotto, foie gras, etc.)
- Saltto taste
- Oilto taste
About "Deboned and Stuffed Quail"
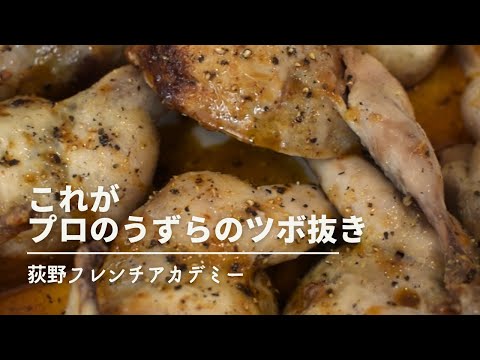
In this video, French chef Ogino demonstrates his unique "bottom-up" method for deboning a quail. By starting from the bottom, which minimizes the risk of tearing the skin, he carefully removes the collarbone, pelvis, femur, and breastbone to create a pouch-like shape. The deboned quail is then stuffed with farce, secured with toothpicks, seared in a pan, and slow-baked in a low-temperature oven. This fundamental French technique can also be applied to other birds like pigeon and game fowl.
Tips for Making "Deboned and Stuffed Quail"
-
Prep
- Using the 'bottom-up' method instead of 'top-down' makes deboning easier and prevents the skin from tearing.
-
Prep
- First, dislocate and cut off the wingtips, remove excess neck fat, and extract the collarbone on its own.
-
Prep
- Dislocate the thighs backward before removing the pelvis. Hold the skin firmly to prevent tearing.
-
Prep
- Pinch the dislocated head of the femur, slide it forward to expose it, bend the knee backward, and cut it free.
-
Prep
- Deboning the breast is the hardest part. Break the membrane with your thumb, cut along the keel cartilage, and push the meat out one side at a time.
-
Prep
- Leaving the drumstick and drumette bones intact is a professional touch for a better presentation.
-
Shaping
- Sew the neck skin closed with a toothpick, spoon in the farce, and push it deep with your fingers. Avoid piping bags to prevent air pockets.
-
Shaping
- After stuffing, sew the tail opening closed with a toothpick, cross the legs, and secure them with a toothpick.
-
Seasoning
- Since no salt is used during deboning, season the entire surface generously with salt right before cooking.
-
Heat control
- Only lightly sear the breast side in the pan to avoid drying it out, then bake in a 160°C oven for 12 to 14 minutes.
-
Heat control
- Aim for an internal temperature of 75°C. Let it rest after baking, then quickly sear again to finish.
Ingredients for "Deboned and Stuffed Quail"
4 items* Tap ingredient names to find on Amazon
How to Make "Deboned and Stuffed Quail"
- 1
Place the knife at the wingtip joint, bend it backward to dislocate it, and cut it off.
- 2
Remove excess fat around the neck with your fingers, expose the collarbone on the breast side using the tip of a knife, and remove it.
- 3
Approach from the bottom (tail end), hold the thigh, bend it backward to dislocate, and separate the femur from the pelvis on both sides.
- 4
Dislocate the joint where the neck meets the pelvis, slide your thumb between the skin and bone, and carefully peel away and remove the pelvis.
- 5
Pinch the dislocated head of the femur, push it forward to expose the bone, bend the knee joint backward to expose it, and cut it free. Repeat on both sides.
- 6
Insert your thumb through the small opening at the bottom and gently break the membrane as you work your way toward the breast meat.
- 7
Once the keel cartilage is visible, make cuts on both sides, insert your index finger, and separate the breast and tenderloin from the bone, working one side at a time while pulling the skin aside.
- 8
Slide your thumb under the shoulder blade to peel the meat away, then cut through the shoulder joint with a knife.
- 9
Turn the whole bird inside out to form a pouch, and check with your fingers to remove any remaining bone fragments (leave the drumstick and drumette bones intact for presentation).
- 10
Sew the excess skin at the neck end closed using a toothpick.
- 11
Spoon the farce into the cavity from the tail end, using your fingers to push it deep inside, including the spaces where the thigh bones were removed.
- 12
Once stuffed, sew the tail opening closed with a toothpick, cross the legs, and secure them with a toothpick to shape.
- 13
Season the entire surface generously with salt right before cooking.
- 14
Heat oil in a pan and sear the quail breast-side down just until lightly browned (do not overcook).
- 15
Bake in a 160°C oven for 12 to 14 minutes (aim for an internal temperature of 75°C if using a thermometer). Let it rest, then quickly sear again to finish.
Detailed Commentary on "Deboned and Stuffed Quail"
* Content organized by topics from the video.
Chef Ogino's Bottom-Up Deboning Method
Chef Ogino introduces the French technique of glove-deboning a quail. While quail eggs are popular, the meat itself is incredibly delicious. There are two main ways to debone a quail: pulling the skin down from the top like removing a shirt, or rolling it up from the bottom. Although the top-down method is commonly seen on YouTube, it easily tears the skin and is highly difficult. Chef Ogino strongly recommends the bottom-up approach. Having prepped thousands of quails, the chef confidently claims he would place near the top in a world championship. This lifelong skill applies not only to quail but also to pigeon and other game birds. It serves as the foundation for creating unique, fully edible showstoppers for special occasions when you want a break from beef, pork, or chicken.
Removing Wingtips and the Collarbone
The prep begins with the wingtips. Since they aren't needed for this dish, they are cut off first. Insert the knife until it hits the bone, bend the joint backward to dislocate it, and it will slice off easily. Next, remove excess fat around the neck with your fingers. This reveals the breast meat and the collarbone. Press down on the collarbone, run the tip of your knife along it to expose it, and detach the top connection with your fingers to pull it out in one piece. Removing this independent bone first is a key step in Chef Ogino's method. Because quails are so small, the process can feel surprisingly anatomical, prompting a wry laugh from the chef about how graphic it would seem on a human scale, adding a touch of real kitchen atmosphere.
Detaching the Pelvis and Thighs Safely
After removing the collarbone, we move to the core of Chef Ogino's method: the bottom-up approach. The thighs and pelvis are located at the bottom of the quail. Since the skin here tears very easily, it is crucial to hold the skin firmly with your fingers and proceed with caution. Hold the thigh, bend it backward to dislocate it, and separate the femur from the pelvis. Repeat this on both sides. Once dislocated, move on to the pelvis, which runs down from the neck. Snap the joint where the neck meets the pelvis backward, slide your thumb between the skin and bone, and peel the pelvis away. By sharpening your tactile senses to avoid damaging the skin, you can cleanly separate the bone while leaving the meat and skin perfectly intact.
Exposing the Femur and Cutting the Knee
With the pelvis removed, the next step is to extract the thigh bone (femur). Pinch the head of the previously dislocated femur and slide it forward. The bone will pop out of the meat. Push further to expose the knee joint at the end of the bone. Bend the knee joint backward to fully expose it, then slide your knife into the joint to cut it free. Repeat this process for both thighs. If any pelvic fragments remain in the meat, remove them carefully with your fingers. Once this stage is complete, the pelvis and thigh bones are entirely gone, leaving the lower half of the quail completely boneless and pliable. This requires delicate finger control to push the bones out without tearing the meat.
The Hardest Part: Deboning the Breast
Now we enter the most technical and difficult part of the process: separating the breast meat. You must peel the entire breast meat away through the small opening at the bottom without tearing it. Since the breast is covered by a membrane, use your thumb to gently break it as you move forward. Once you see the keel cartilage in the center, make cuts along both sides of it. Since there is only bone and no skin directly behind this area, you don't have to worry about tearing the skin with your knife. After making the cuts, insert your index finger to pull the breast and tenderloin away from the bone. Doing both sides at once can tear the skin, so work one side at a time, keeping the skin pulled back while pushing the breast meat forward with your thumb. Finally, slide your thumb under the shoulder blade, scrape the meat off gradually with the knife, and cut through the shoulder joint.
A Boneless Pouch and Professional Speed
Once the shoulder joints are cut, turn the entire bird inside out to reveal a beautiful, undamaged, pouch-like quail. With absolutely no bones left inside, the glove-deboning is complete. However, to maintain a nice presentation, leaving the drumstick and drumette bones intact is a professional touch. Finally, check the area where the pelvis was with your thumb to remove any tiny bone fragments. Chef Ogino notes that in a professional kitchen, you are expected to debone one quail in about 40 seconds. 'We usually prep 50 or 60 at a time, so if you take 5 minutes per bird, you'd get kicked by your seniors,' he laughs, sharing a glimpse into the demanding reality of classical French training where speed and precision are paramount.
Stuffing and Shaping with Toothpicks
Once deboned, it's time to stuff the quail with farce. While a meat-based farce is used here, pilaf, risotto, or foie gras also make excellent fillings. First, sew the excess skin at the neck end closed with a toothpick to seal the opening. Next, spoon the farce through the tail opening. One quail holds about 100g of stuffing. After spooning it in, use your thumb to push it deep inside. Avoid using a piping bag, as it easily creates air pockets; using your fingers allows you to pack the stuffing into every corner, especially the empty thigh spaces. Once fully stuffed, sew the tail opening closed with another toothpick. Finally, cross the legs and secure them with a toothpick to give the bird a neat, elegant shape for presentation.
Slow-Baking for the Perfect Cook
Now, it's time to cook the prepped quail. Since no salt was used during deboning, season the entire surface generously with salt right before cooking. Heat oil in a pan and start searing breast-side down. Cooking a quail all the way through in a pan is difficult, so it is best finished in the oven. Sear it in the pan just enough to get a light color, coat it with oil, and flip it immediately. Be careful not to overcook it at this stage, or the meat will dry out. Once seared, transfer it to a low-temperature oven (150–160°C) and bake for 12 to 13 minutes to cook it through. If using an instant-read thermometer, aim for 75°C. Let it rest after baking, then give it a quick final sear to finish. The sauce and plating will be covered in the next video, and the clip ends with an introduction to 'Yokosuka Nakanagaya,' the venue that provided the kitchen.
About 荻野フレンチアカデミー
荻野フレンチアカデミー
2,010人 subscribers ・ フランス料理
* Opens YouTube channel
* Subscriber count is as of article creation and may differ from the current number.
