

Recipe
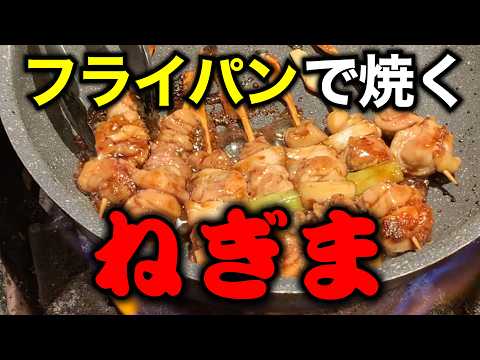
No Grill or Charcoal Needed! Pro-Level Pan-Seared Yakitori (Negima)
Ingredients
- Chickenthigh: to taste (approx. 35–45g per skewer)
- Japanesescallion (negi): to taste (cut into 3cm pieces)
- Salt:to taste
- Yakitorisauce: to taste (for sauce-style)
- Vegetableoil or garlic oil: a small amount (only if needed to prevent sticking)
- Flatbamboo skewers: as needed
About "Pan-Seared Chicken and Scallion Yakitori (Negima) - Salt & Sauce"
Mr. Noami, president of the yakitori specialty restaurant "Nonotori," explains how to make professional-grade chicken and scallion yakitori (negima) using a home frying pan and supermarket chicken. Cutting the chicken thigh skin-side down ensures clean cuts, and skewering smaller pieces at the base and larger pieces at the tip ensures even cooking. The key is cooking over ultra-low heat covered with foil for 4 minutes per side to keep it juicy, then finishing over high heat for a crispy exterior. For salt-style, finish with a sprinkle of salt; for sauce-style, quickly glaze over high heat to create a beautiful sheen.
Introduction to 【野乃鳥】野網厚詞の鳥、まるごと。 →
Tips for Making "Pan-Seared Chicken and Scallion Yakitori (Negima) - Salt & Sauce"
-
Prep
- Always cut the chicken thigh skin-side first. Cutting from the flesh side makes the skin cuts uneven.
-
Prep
- If using frozen meat, thoroughly wipe away any thawed moisture with paper towels. Excess moisture makes cooking difficult and causes odors.
-
Prep
- Skewer the smallest piece of meat at the base, medium in the middle, and the largest at the tip to ensure even cooking.
-
Prep
- Keep the skewer and your hand in a straight line, tuck your elbows in, and use your body weight to push down toward the cutting board.
-
Prep
- Use a scale to ensure each skewer weighs between 35g and 45g (aiming for 40g).
-
Heat Control
- Start cooking over ultra-low heat. High heat causes the meat to shrink and lose its juices.
-
Heat Control
- Cover with foil as a lid, leaving a small gap to let steam escape. Cook for 4 minutes on each side.
-
Heat Control
- After cooking both sides over low heat, finish over high heat for 10 to 20 seconds per side to crisp the surface.
-
Heat Control
- Since home stoves are hotter in the center, move the pan or swap the skewers to prevent uneven cooking.
-
Seasoning
- For salt-style, apply salt in two stages: initial and finishing. Pat the meat gently after salting to help it adhere.
-
Seasoning
- For sauce-style, lightly salt only one side of the skewers first (less than the salt-style).
-
Seasoning
- For sauce-style, pour the sauce into the empty space after cooking on low heat, then glaze quickly over high heat for 30 seconds. Avoid burning.
-
Finishing
- Wipe the handles of the skewers with a paper towel before plating.
-
Finishing
- Frequently wipe away excess moisture and fat during cooking to prevent unpleasant odors.
-
Ingredients
- Domestic young chicken is recommended. A longer rearing period yields richer flavor (broilers: 40–50 days, red-feathered: ~60 days, heritage: 75+ days).
Ingredients for "Pan-Seared Chicken and Scallion Yakitori (Negima) - Salt & Sauce"
6 items* Tap ingredient names to find on Amazon
How to Make "Pan-Seared Chicken and Scallion Yakitori (Negima) - Salt & Sauce"
- 1
Place the chicken thigh skin-side up. Cut through the skin first, slicing it into long strips about 3cm wide (roughly the length of your thumb's first joint).
- 2
Cut the strips into three sizes: small pieces (1–1.5cm wide) for the base of the skewer, medium pieces for the middle, and large pieces for the tip.
- 3
Cut the Japanese scallion into 3cm pieces.
- 4
Skewer the ingredients. Keep your elbows tucked in and align the skewer straight with your hand. Thread them in this order: small chicken -> scallion -> medium chicken -> scallion -> small chicken -> large chicken at the tip. Hold the scallion gently with your fingers while skewering to prevent it from splitting. Use a scale to ensure each skewer weighs around 40g.
- 5
[Salt-style] Sprinkle a generous amount of salt (the initial salt, more than the finishing salt) over the skewers, then gently pat them with your hand to help the salt adhere to the meat.
- 6
Heat a frying pan over ultra-low heat (no oil is needed as the chicken thigh releases its own fat, but you can apply a thin layer if you are worried about sticking).
- 7
Arrange the skewers in the pan, cover them with aluminum foil (leaving a small gap for steam to escape), and cook over ultra-low heat for 4 minutes.
- 8
Flip the skewers, cover again with foil, and cook over ultra-low heat for another 4 minutes. Wipe away any excess moisture or fat with paper towels. Move the pan or rearrange the skewers to ensure even cooking.
- 9
Once cooked through, turn the heat to high and sear both sides for 10 to 20 seconds each to make the surface crispy.
- 10
Sprinkle the finishing salt all over, wipe the handles of the skewers with a paper towel, and plate.
- 11
[Sauce-style] Lightly sprinkle salt on only one side of the skewers (just a small amount is fine).
- 12
Just like the salt-style, cook slowly over ultra-low heat covered with foil for 4 minutes on each side, wiping away excess moisture and fat along the way.
- 13
Once cooked through, push the skewers to one side of the pan and pour a generous amount of yakitori sauce into the empty space.
- 14
Turn the heat to high to reduce the sauce, quickly flipping the skewers for about 30 seconds to coat them evenly (be careful not to burn it).
- 15
Wipe the handles of the skewers with a paper towel and plate.
Detailed Commentary on "Pan-Seared Chicken and Scallion Yakitori (Negima) - Salt & Sauce"
* Content organized by topics from the video.
Pro Yakitori in a Pan! Master the Theory
With 28 years of dedicated yakitori experience, Mr. Noami, president of "Nonotori," teaches how to cook professional-grade yakitori at home using a simple frying pan—no charcoal or grill grate required. While setting up authentic charcoal equipment can be daunting for home cooks, Mr. Noami confidently asserts, "If you understand the underlying science, you can maximize the flavor even in a frying pan." Instead of using premium branded chicken, this recipe uses standard supermarket chicken thighs and breasts cooked in a regular non-stick pan. To satisfy your craving for delicious homemade yakitori, he generously shares his secret professional techniques and the science behind extracting the maximum umami from the meat.
The Art of Cutting Chicken: Skin-Side First
We begin with cutting the chicken thigh. The most crucial point is to slice through the skin side first while paying attention to the direction of the meat fibers. Cutting from the flesh side can cause the skin to slip and become uneven, which is why cutting skin-side first is highly recommended. Slice the meat into long strips about 3cm wide (roughly the length of your thumb's first joint) using about three gentle knife strokes. From there, divide the meat into different sizes: small pieces (1–1.5cm wide) for the base of the skewer, medium pieces for the middle, and large pieces for the tip. If you are using frozen yakitori skewers, you can cook them the same way, but it is vital to thoroughly wipe away any thawed moisture (drip) with paper towels. Excess moisture makes cooking difficult and causes unpleasant odors, so even with fresh supermarket meat, be sure to pat it dry if there is surface moisture.
Perfect Negima Skewering: Keep It Straight
Next is skewering the "negima," the iconic face of yakitori. Cut the Japanese scallions into 3cm pieces and thread them using stylish flat bamboo skewers. The secret to skewering is keeping the skewer and your hand in a straight line. Tuck your elbows in and use your body weight to push down toward the cutting board; this allows you to skewer quickly and neatly. When threading the scallions, hold them gently with your fingers to prevent them from splitting. Thread them in this order: the smallest piece of meat at the base, scallion, medium meat, scallion, small meat, and the largest piece of meat at the very tip. Placing smaller pieces at the base and larger ones at the tip ensures even cooking. Aim for 35g to 45g (40g in the video) per skewer. Mr. Noami still uses a scale to check the weight of every single skewer, just as he did during his apprenticeship, explaining his dedication: "If I don't lead by example, my staff won't use scales either."
Ultra-Low Heat: Cook Gently Like a Lover
Now, we move on to the cooking process. For the salt-style, salting is done in two stages: the "initial salt" and the "finishing salt." After salting the meat, gently pat it with your hand to make sure it adheres well. Since chicken thighs release plenty of fat, you don't need oil in the pan, but you can apply a thin layer of vegetable or garlic oil if you are worried about sticking. The most important secret here is cooking over "ultra-low heat." Searing the surface over high heat too quickly prevents the meat from plumping up and causes it to shrink. By cooking slowly and gently over ultra-low heat, the meat shrinks less, locking in the flavorful juices for a moist and juicy finish. Expressing his deep love for the craft, Mr. Noami says, "Treat the chicken gently, as if you are embracing a lover." Cover the pan with aluminum foil as a lid, leaving a small gap to let steam escape, and cook for 4 minutes.
Finish on High Heat for a Crispy Exterior
After cooking covered with foil over ultra-low heat for 4 minutes, flip the skewers and cook for another 4 minutes. Since home stoves often have stronger heat in the center, the trick is to move the pan or swap the positions of the skewers to prevent uneven cooking. Frequently wiping away excess moisture and fat with paper towels ensures a clean finish without any unpleasant odors. Once both sides have cooked slowly for 4 minutes each and are fully done, it's time for the final touch. Turn the heat to high and sear both sides for 10 to 20 seconds to crisp up the skin. Searing the surface at a high temperature while the meat is plump locks in the moisture, creating a crispy, fragrant exterior and an incredibly tender, juicy interior. Finish with a final sprinkle of salt, and you'll have exquisite salt yakitori that tastes nothing like standard supermarket meat.
Choosing Chicken & Cooking Sauce-Style
Next, we make the sauce-style yakitori. For the sauce-style, start by lightly salting just one side of the skewers (much less than the salt-style). The cooking method is identical: cook slowly over ultra-low heat covered with foil for 4 minutes on each side. Here, Mr. Noami shares some tips on choosing chicken at the supermarket. He highly recommends domestic young chicken for yakitori, suggesting you pay attention to the "rearing period." While standard broilers are shipped in 40 to 50 days, red-feathered chickens (Akadri) are raised for about 60 days, and heritage chickens (Jidori) are raised for 75 days or more. Although a longer rearing period increases feed costs and price, it allows the meat to develop a much deeper, richer flavor. If you want to make truly exceptional yakitori, look for chicken with a longer rearing period.
Glazing with Sauce: Perfect for Bento
After cooking both sides over low heat for 4 minutes each, it's time to apply the glaze. We use the secret professional sauce introduced in a previous video. Push the skewers to one side of the pan and pour a generous amount of sauce into the empty space. Turn the heat to high and quickly reduce the sauce while coating the skewers. The high heat creates a beautiful, glossy sheen and plumps up the meat, but be careful not to overdo it, as the sauce can burn and turn bitter. The key is to quickly flip the skewers for about 30 seconds to coat them evenly. Once cooked, wiping the handles of the skewers with a paper towel before plating is a professional touch. The glazed chicken thighs are incredibly tender, and the scallions absorb the rich chicken fat, becoming sweet and juicy—making this a perfect pairing for beer. They remain delicious even when cold, making them an excellent addition to bento lunch boxes.
About 【野乃鳥】野網厚詞の鳥、まるごと。
【野乃鳥】野網厚詞の鳥、まるごと。
7,210人 subscribers ・ 焼き鳥
* Opens YouTube channel
* Subscriber count is as of article creation and may differ from the current number.
