

Recipe
Foolproof Tempura Recipe: How to Make Carrot Kakiage | Crispy & Sweet, Won't Fall Apart with Just Flour!
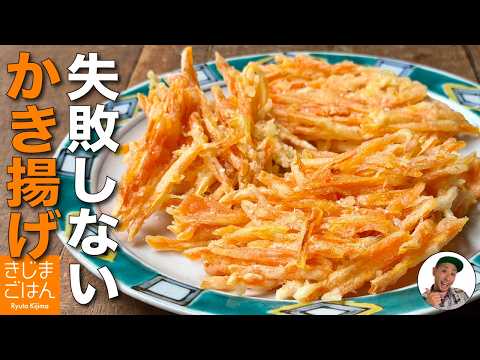
Ingredients
- 1carrot (150g)
- 1tbsp flour (for dusting)
- 4tbsp flour (for batter)
- 4tbsp water (for batter)
- Fryingoil, as needed (about 1 cm deep in the pan)
- Saltor tempura dipping sauce (tsuyu), to taste
About "Carrot Kakiage Tempura"
This crispy carrot kakiage tempura recipe uses just one carrot and a simple batter of flour and water. The key secret is dusting the carrots with flour beforehand, which acts as an adhesive and prevents them from falling apart in the oil. It's easy to make in a frying pan with just 1 cm of oil. Frying for about 4 minutes in total coaxes out the carrot's natural sweetness while keeping a pleasant, crisp texture. You can also enjoy leftovers the next day simmered in tempura dipping sauce (tsuyu) over rice!
Introduction to きじまごはん 【料理家きじまりゅうた公式チャンネル】 →
Video Timestamps
Tips for Making "Carrot Kakiage Tempura"
-
Prep
- Peel one side of the carrot extra times to create a flat surface. This stabilizes it on the cutting board, making it safer and easier to cut.
-
Prep
- Slice the carrot diagonally into 3–4 mm slices, then julienne. Use a knife instead of a mandoline, which can cause uneven edges and release excess moisture.
-
Preventing Crumbling
- Dust the cut carrots directly with 1 tbsp of flour to create a coating (adhesive) before mixing with the batter.
-
Batter Prep
- Push the carrots to the side of the bowl, add 4 tbsp of flour and 4 tbsp of water to the empty space, mix lightly until slightly floury, then combine with the carrots.
-
Frying
- Heat 1 cm of oil to 170°C (340°F) in a frying pan. Slide the mixture in using a large spoon to keep its shape.
-
Frying
- Once in the oil, poke a few holes in the kakiage with chopsticks to let the oil circulate, making them extra crispy.
-
Heat Control
- Fry for about 2 minutes, flip, and fry for another 2 minutes. They are done when the surface is crunchy and firm.
-
Serving
- Enjoy with salt or tempura sauce. Leftovers are also delicious simmered in tempura sauce and served over rice.
Ingredients for "Carrot Kakiage Tempura"
6 items* Tap ingredient names to find on Amazon
How to Make "Carrot Kakiage Tempura"
- 1
Cut off the top of the carrot and peel it completely. Peel one side 3 more times to create a flat surface, then place that flat side down on the cutting board to stabilize it.
- 2
Slice the carrot diagonally into 3–4 mm thick slices. Stack them slightly overlapping, align the edges, and julienne them into 3–4 mm matchsticks.
- 3
Place the julienned carrots in a large bowl, sprinkle with 1 tbsp of flour, and toss well to coat thoroughly.
- 4
Push the carrots to the back of the bowl to make space in the front. Add 4 tbsp of flour and 4 tbsp of water to the empty space, and mix lightly until just combined with some flouriness remaining to make the batter.
- 5
Mix the carrots and batter together all at once in the bowl until evenly coated.
- 6
Pour about 1 cm of oil into a frying pan and heat to 170°C (340°F) (test by inserting the tip of a chopstick; fine bubbles should form immediately).
- 7
Scoop a portion of the mixture onto a large spoon, gently slide it into the oil, and shape it. Use the tips of your chopsticks to poke a few holes in the kakiage.
- 8
Fry for about 2 minutes until the batter sets, then flip and fry for another 2 minutes. Once the surface is crunchy and firm, transfer to a wire rack.
- 9
Sprinkle with salt or serve with tempura dipping sauce as desired.
Detailed Commentary on "Carrot Kakiage Tempura"
* Content organized by topics from the video.
No Rolling! The Trick to Stabilizing Carrots
Hi, I'm culinary expert Ryuta Kijima. Today, I'm sharing a recipe for Carrot Kakiage that stays together using just flour, turning out sweet and crispy. Let's start with the prep. Cut off the top of the carrot and peel the skin. Here is a signature Kijima technique: carrots are round and roll around easily, so use your peeler to shave one side about three extra times to create a flat surface. Placing this flat side down on the cutting board stabilizes the carrot so it won't roll. This makes the subsequent knife work dramatically easier. When cutting hard vegetables like carrots, this stability is incredibly important.
Keep the Texture! Why Hand-Cutting is Best
First, slice the stabilized carrot diagonally into 3–4 mm slices. Thanks to the flat surface we made, it's incredibly easy and safe to cut. Once sliced, stack them slightly overlapping and julienne them into 3–4 mm matchsticks. While using a mandoline slicer might seem easier, it can leave uneven edges, causing the carrots to overcook or release excess moisture. That's why hand-cutting with a knife is highly recommended. This easily yields julienned carrots that maximize their crisp texture and natural sweetness.
One-Bowl Trick to Keep Tempura Together
Place the cut carrots into a slightly larger bowl. We will use just this single bowl from start to finish. Here is my special tip to prevent the kakiage from falling apart in the oil. First, sprinkle 1 tablespoon of flour directly onto the carrots and toss well to coat. Creating this flour coating around the carrots acts as an adhesive, keeping them together during frying. Once coated, push the carrots to the back of the bowl to clear a space in the front. Add 4 tablespoons of flour and 4 tablespoons of water to that space, and mix lightly until just combined with some flouriness remaining to make the batter.
Coating and Frying in Shallow Oil
Mix the batter and the carrots together all at once to coat them. The moisture from the batter combines with the flour coating on the carrots, strengthening the adhesive effect. Next, pour about 1 cm of oil into a frying pan and heat to 170°C (340°F). You can test the temperature by dipping the tip of a chopstick in; fine bubbles should form immediately. To add the mixture to the oil, scoop a portion onto a large serving spoon and gently slide it in to keep its shape. Once in the oil, poke a few holes in the kakiage with the tips of your chopsticks. This creates pathways for the oil, making them even crispier.
Frying Both Sides in Shallow Oil
Since we are using a small amount of oil, we'll shallow-fry them. After about 2 minutes of frying, flip them over. The batter will already be firm, so you can easily flip them with just chopsticks. Once flipped, fry for another 2 minutes. I often say that out of all kakiage, carrot-only kakiage might be my absolute favorite. Frying them slowly coaxes out the carrot's sweetness, making them tender yet leaving a wonderfully crisp bite. They are amazing eaten plain with a bit of salt, or dipped in tempura sauce.
Amazing Crunch and Clean Oil: A Perfect Finish
After frying for about 4 minutes in total, they are done when the surface feels crunchy and firm. When you transfer them to a wire rack, you'll notice almost no loose batter crumbs left in the oil. This is proof that the flour coating worked perfectly to keep them together. Cutting one in half on a cutting board produces an incredibly satisfying crunch. They are cooked through perfectly, and you can see how light and crispy they are. It's also wonderful that just one carrot makes four generous, hearty kakiage.
Tasting and Leftover Ideas: Simmered Tempura
Sprinkle a little salt on the finished kakiage and enjoy. With the first bite, the crunchy texture of the batter is followed by the rich sweetness of the carrot filling your mouth. This technique is a lifelong versatile recipe that you can apply to any leftover vegetables in your fridge. My absolute favorite way to eat them since childhood is making 'simmered tempura' with leftovers the next day, cooking them in tempura sauce. Eating the soft, sauce-soaked kakiage over a bowl of hot rice is pure bliss. I hope you all try making these sweet, crispy kakiage!
About きじまごはん 【料理家きじまりゅうた公式チャンネル】
きじまごはん 【料理家きじまりゅうた公式チャンネル】
14.7万人 subscribers ・ 家庭料理
* Opens YouTube channel
* Subscriber count is as of article creation and may differ from the current number.
