

Recipe
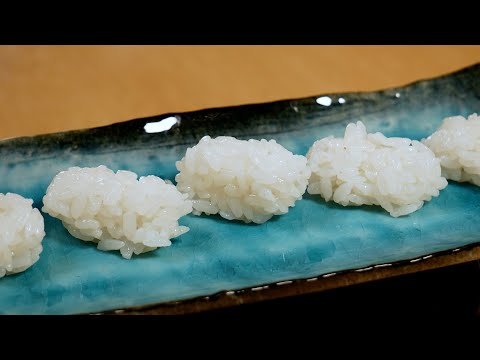
How to Make High-End Sushi Rice in a Rice Cooker
Ingredients
- 150guncooked white rice (approx. 1 rice cooker cup)
- 100–150gwater (adjust based on serving style and season)
- 50gsushi vinegar
About "Sushi Rice (Shari)"
A complete guide to making high-end restaurant-quality sushi rice (shari) using a home electric rice cooker. We walk you through every professional step, including precise rice measurement, washing with water pressure, soaking in the fridge for 1 hour, using the quick-cook setting, and mixing (shari-giri) in a bowl. It is packed with practical techniques, such as adjusting the sushi vinegar for the season and keeping the rice warm to preserve its delicious texture.
Introduction to 蒼の鮨 sushi-chef ao →
Tips for Making "Sushi Rice (Shari)"
-
Prep
- Avoid measuring cups and use a scale to measure rice precisely in 150g increments to prevent inconsistencies in the final cook.
-
Prep
- Wash the rice using water pressure by moving your hands side to side; avoid rubbing the grains together. Broken grains cause uneven cooking.
-
Prep
- Soak the rice in the refrigerator for 1 hour to stabilize the absorption rate at around 80% and prevent seasonal temperature variations.
-
Heat control
- Always select the 'quick-cook' mode. Since the rice is pre-soaked, the regular cooking mode is unnecessary.
-
Seasoning
- Adjust the flavor to the season and the guests' physical condition, such as making the sushi vinegar stronger with more salt in the summer.
-
Technique
- For mixing, transfer to a bowl, use the paddle vertically, and flip the rice while mixing finely to make each grain distinct and fluffy.
-
Finishing
- Fan with a hand fan to cool the surface and let the vinegar absorb. The rice is ready when it is not sticky and has no clumps when shaped.
Ingredients for "Sushi Rice (Shari)"
3 items* Tap ingredient names to find on Amazon
How to Make "Sushi Rice (Shari)"
- 1
Measure the rice precisely
Use a digital scale to measure the rice precisely in 150g increments. Avoid using a measuring cup to scoop and level, as this causes inconsistencies in weight each time.
- 2
Wash the rice using water pressure
Spread your fingers and move them side to side, using water pressure to wash the rice. Avoid rubbing the grains together (ogami-arai) to prevent them from breaking. Repeat the washing and draining process about 3 times.
- 3
Soak the rice in the refrigerator
After washing, let the rice soak in the refrigerator for 1 hour. This allows the absorption rate to reach a stable 80% and prevents seasonal temperature variations from affecting the soaking speed.
- 4
Drain in a strainer
Once soaked, transfer the rice to a strainer and drain it thoroughly. Since any remaining water will affect the final moisture level when cooking, it is crucial to drain it carefully every time.
- 5
Add water and cook in the rice cooker
Place the rice and water in the rice cooker. The standard ratio is 150g of water (equal to the rice weight). If eating immediately, reduce the water to about 100g for a firmer texture. If keeping it for later (like takeout), use 150g or more to maintain a soft, chewy texture. Always set the cooker to 'quick-cook' mode.
- 6
Prepare the sushi vinegar
Prepare the sushi vinegar while the rice is cooking. The standard ratio is 50g of vinegar per 150g of rice. Store-bought sushi vinegar is highly convenient. Adjusting the amount according to the season (e.g., adding more in summer) to control the flavor intensity is a professional touch.
- 7
Drizzle sushi vinegar over the rice
Once the rice is cooked, drizzle the sushi vinegar evenly over the rice by pouring it down the rice paddle. Avoid pouring it directly onto the rice to prevent uneven flavoring. Gently shake the inner pot to help it distribute, ensuring the vinegar mixes thoroughly.
- 8
Mix the rice (shari-giri) in a bowl
Invert the inner pot into a large bowl to release the rice. Use the rice paddle vertically to gently break up any clumps. Once broken up, flip the rice over, spread it flat, then push it to one side and mix with a slicing motion, working through small sections at a time.
- 9
Cool with a hand fan to finish
Use a hand fan to cool the surface of the rice and help it absorb the sushi vinegar. Check the temperature with your hand; if it is still warm, flip the rice over and fan it again.
- 10
Keep the finished sushi rice warm
Line the inner pot with a sushi rice net (shari-net), transfer the rice inside, and press the keep-warm button. Alternatively, use a commercial rice warmer or place it in a wooden sushi tub (hangiri) lined with a damp cloth. The rice is perfect when it holds together well when shaped but is not sticky.
Food Science
By adjusting the water ratio during cooking and mixing the sushi vinegar into the freshly cooked rice, the surface of each grain is coated, resulting in a distinct, non-sticky texture (moisture control). Additionally, adding vinegar lowers the pH, which inhibits starch retrogradation (hardening) and maintains a soft, chewy texture even after the rice cools (role of pH and acidity). Furthermore, the harmony of sourness, saltiness, and sweetness balances the five basic tastes.
Detailed Commentary on "Sushi Rice (Shari)"
* Content organized by topics from the video.
Why home rice cookers work for high-end rice
Today, we will thoroughly explain how to make high-end restaurant-quality sushi rice (shari) at home. First of all, high-end sushi restaurants with limited seating do not make sushi rice in massive batches. Therefore, when cooking a small amount of rice, many restaurants actually use electric rice cookers to perfectly control the temperature and steaming process. This is why you can make incredibly delicious sushi rice, just like a high-end shop, using a home rice cooker. Today, we will introduce a detailed method that includes mixing the rice in a bowl, a technique frequently adopted in modern professional kitchens. Even in steps that seem simple, there are professional reasons and attention to detail, so please use this as a guide for your home sushi-making.
Precise measuring and washing with water pressure
The first step to delicious sushi rice starts with precise measurement. Treat 1 cup of rice as 150g and always use a scale to measure by weight. Standard measuring cups can lead to variations in weight each time, making the final cook inconsistent. Next, when washing the rice, the key is to use 'water pressure.' Spread your fingers and move them side to side, letting the water pressure do the washing. Avoid rubbing the grains together (ogami-arai), as this can break the rice, alter how water is absorbed, and cause uneven cooking. Modern milling technology is highly advanced, so the rice is already very clean without vigorous scrubbing. Repeating the wash-and-drain process about 3 times is more than enough to complete this step.
Soaking and draining for consistent results
After washing, let the rice soak in the refrigerator for 1 hour. Why 1 hour? Because after 1 hour, the rice reaches a stable absorption rate of about 80%, and soaking it any longer won't change the water content. Soaking for the exact same duration every time ensures consistent conditions and prevents variations in the final cook. Additionally, to prevent the soaking speed from changing with the weather, storing it in the refrigerator—where the temperature remains constant regardless of the season—is a professional rule of thumb. After soaking, the rice will look whiter. Next, transfer the rice to a strainer to drain. Thorough draining is crucial here as well; any variation in remaining water will throw off the cooking ratio, so make sure to drain it well every time.
Water ratio and the secret of quick-cook mode
After draining, measure the amount of water to add to the rice cooker. The standard is an equal ratio of 150g of water to 150g of rice. If you plan to mix and eat the sushi rice immediately, reducing the water to about 100g will yield a slightly firm, distinct texture typical of high-end shops. However, low-moisture sushi rice degrades quickly over time. If you are making chirashi sushi or fat rolls (futomaki) for takeout to eat later, use 150g or more of water to keep it moist and chewy for longer. Finally, always set the cooking mode to 'quick-cook'. While the regular mode automatically includes soaking and steaming stages, we have already soaked the rice for an hour and do not need extra steaming. Therefore, the 'quick-cook' mode, which minimizes these stages, is the optimal choice.
The golden ratio of sushi vinegar by season
While the rice is cooking, prepare the sushi vinegar. The standard ratio is 50g of sushi vinegar per 150g of rice. For home cooking, using a pre-blended, store-bought sushi vinegar is highly convenient and tastes great to everyone. A hidden professional secret is adjusting the flavor according to the season. Especially in the summer, when people sweat more and crave salt, slightly increasing the amount of sushi vinegar to create a bolder flavor makes the sushi taste even better. Controlling the intensity of the flavor based on the season and the physical condition of the guests is one of the hospitality techniques practiced by high-end sushi restaurants.
Pro mixing techniques for fluffy, distinct grains
Once the rice is cooked, it is time for shari-giri (mixing). Remove the inner pot and drizzle the sushi vinegar evenly over the rice by pouring it down the rice paddle. Do not pour it directly onto the rice, as this causes uneven flavor. Shake the pot slightly to distribute, then flip it into a bowl. Use the paddle vertically to gently break up the clumped rice. Once broken up, flip the rice over and spread it flat with the paddle. Next, push the rice to one side and mix it by slicing through small sections. Visually checking and breaking up any clumps ensures each grain becomes perfectly coated and distinct. Finally, fan the rice with a hand fan to cool the surface and help it absorb the vinegar. Check the temperature with your hand; once cooled, flip it over and fan again to finish.
Three ways to keep your sushi rice warm
Here are three ways to keep your finished sushi rice warm and delicious. The first is to line the inner pot with a sushi net (shari-net), place the rice inside, and press the keep-warm button on your rice cooker—a method often used in sushi shops. The second is to place the net and rice into a commercial warmer, which is the mainstream method in restaurants. The third is using a wooden tub (hangiri), which is easy to replicate at home. When using a wooden tub, never put the rice directly in, as the wood will absorb the moisture from the sushi vinegar. Always line it with a damp cloth first. If you shape a small ball of rice and it holds together well without being sticky, you have succeeded. By faithfully following these professional steps, you can recreate incredibly authentic, high-end sushi rice at home.
About 蒼の鮨 sushi-chef ao

蒼の鮨 sushi-chef ao
3.2万人 subscribers ・ 和食/寿司
* Opens YouTube channel
* Subscriber count is as of article creation and may differ from the current number.
