

Recipe
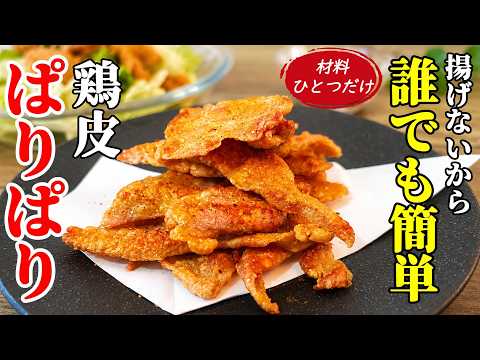
Better than an Izakaya! [Crispy Chicken Skin] Only 1 Ingredient: Chicken Skin! The ultimate recipe anyone can make!
Ingredients
- 350gchicken skin
- 1/2tsp salt
- 1/3tsp pepper
- 1/2tsp chicken bouillon powder
- Blackpepper, to taste
- Lettuceor other vegetables, as needed (for salad)
- 1.5tbsp mirin
- 1tbsp rice vinegar
- 2tbsp lemon juice
- 75mlsoy sauce
- 4gbonito flakes (katsuobushi)
- Apinch of sugar (for dressing)
- Apinch of grated garlic (for dressing)
About "Crispy Chicken Skin (Torikawa Senbei)"
This Crispy Chicken Skin recipe uses just 350g of chicken skin. By parboiling to remove excess fat and carefully scraping away the remaining fat, you can achieve a perfect crispy texture without using any flour or starch. Press it down with a weight to pan-fry slowly, and season with salt, pepper, and chicken bouillon powder right before finishing. You'll also learn how to make a salad using a dressing made from the rendered chicken oil.
Tips for Making "Crispy Chicken Skin (Torikawa Senbei)"
-
Prep
- Parboiling the chicken skin for 2 minutes to remove excess fat and impurities is the most crucial step for a crispy texture.
-
Fat Removal
- Cool in cold water and scrape off all the soft fat. Save the removed fat to render into chicken oil instead of throwing it away.
-
Moisture Control
- Thoroughly drying the skin with paper towels prevents oil splattering and ensures an even, crispy finish.
-
Cooking Method
- Arrange outer skin side down, cover with non-stick foil and a plate as a weight, and fry slowly over medium-low heat for 5 minutes per side.
-
Seasoning
- Season immediately after cooking to prevent the spices from washing away with the fat, ensuring the flavor sticks.
Ingredients for "Crispy Chicken Skin (Torikawa Senbei)"
13 items* Tap ingredient names to find on Amazon
How to Make "Crispy Chicken Skin (Torikawa Senbei)"
- 1
Parboiling the Chicken Skin
Parboil 350g of chicken skin in plenty of boiling water for 2 minutes. Stir with chopsticks to separate them. Once they turn white and firm up, remove them from the water. This is a crucial step to remove excess fat and impurities.
- 2
Cooling and Removing Excess Fat
Thoroughly cool the parboiled chicken skin under cold running water. Once cooled, the soft fat will solidify and turn white, making it easy to gently scrape off with your fingers. Save the removed fat in a separate bowl to render into chicken oil later.
- 3
Thoroughly Drying the Chicken Skin
Drain the cleaned chicken skin and the saved fat separately in colanders. Then, use paper towels to thoroughly pat them dry. Do not skip this step, as removing all moisture prevents oil splattering and ensures an even, crispy texture.
- 4
Arranging in the Pan and Preparing Weights
In a wide, shallow frying pan, arrange the dried chicken skin in a single layer with the outer skin side (the side opposite to where you scraped the fat) facing down. Cover with non-stick aluminum foil, and place a heavy, heat-resistant flat plate on top as a weight. This prevents the chicken skin from curling up.
- 5
Rendering Chicken Oil (Schmaltz)
Transfer the saved fat to a small frying pan and heat over high heat starting from a cold pan. As it heats up, the fat will melt into a beautiful golden chicken oil. The remaining solids will turn into crispy, fragrant bits. Strain through a sieve to separate the oil from the crispy bits.
- 6
Slow-Frying the Chicken Skin (First Side)
Place the weighted pan with the chicken skin over medium-low heat and fry slowly for about 5 minutes. Occasionally, use a towel to protect your hand and press down firmly on the plate to squeeze out remaining moisture and fat. Once the bottom is golden brown and crispy, it's ready to flip.
- 7
Slow-Frying the Chicken Skin (Second Side)
Flip the chicken skin over, cover with the foil and plate again, and fry for another 5 minutes. Cook until the second side is also golden brown and crispy.
- 8
Draining Oil and Final Seasoning
Once both sides are completely crispy, drain the rendered chicken oil from the pan. While the chicken skin is piping hot, sprinkle with 1/2 tsp salt, 1/3 tsp pepper, and 1/2 tsp chicken bouillon powder. Be sure to season right after cooking so the seasoning doesn't wash away with the fat.
- 9
Finishing and Plating
Finally, press down with the back of a ladle to distribute the seasoning evenly. Serve on tempura paper for an authentic izakaya-style presentation.
- 10
Food Science
Slowly cooking the chicken skin to evaporate moisture creates a crispy texture and a savory aroma through the Maillard reaction. Additionally, combining the inosinic acid in the chicken skin and bonito flakes with the glutamic acid in the soy sauce and chicken bouillon powder creates a powerful umami synergy. Furthermore, the acidity from the vinegar and lemon juice in the dressing cuts through the rich fat of the chicken skin, balancing the overall flavor with a refreshing finish.
Detailed Commentary on "Crispy Chicken Skin (Torikawa Senbei)"
* Content organized by topics from the video.
An Ultimate Recipe Born from 15 Years of Training
The speaker, calling himself Leonardo Kuma, shares a recipe for Crispy Chicken Skin that was highly popular at a small restaurant where he used to work. He starts with a humorous joke, claiming his training at the restaurant lasted '15 years in my imagination.' All you need is 350g of chicken skin. First, parboil the chicken skin in plenty of boiling water. Stir with chopsticks to separate them and boil for about 2 minutes. Once they turn white and firm up, remove them from the water. This initial parboiling is a crucial first step to remove excess fat and dramatically improve the final texture. The fruits of his '15 years of imaginary training' are fully realized in this simple yet essential step.
Pro Tip: Meticulous Fat and Moisture Removal
Once parboiled, immediately cool the chicken skin under cold running water. Cooling causes the soft fat on the inside of the skin to solidify and turn white, making it much easier to remove. Gently run your fingers along the inside of the skin to locate the fat deposits, then scrape them off completely. This fat is packed with flavor, so don't throw it away—save it in a separate bowl. After removing the fat, drain both the skin and the fat in colanders, then use paper towels to thoroughly pat them dry. Any remaining moisture will cause the oil to splatter during frying, so drying them completely is a key professional secret.
Pan Arrangement and the Weight Trick
For cooking, use a wide, shallow frying pan. Arrange the thoroughly dried chicken skin in the pan. The most important tip here is to place the outer skin side (the side opposite to where you scraped the fat) facing down. Once arranged tightly with no gaps, cover them with non-stick aluminum foil. Place a heavy, heat-resistant flat plate on top to act as a weight. Pressing down firmly prevents the chicken skin from curling up, ensuring it cooks evenly into a crispy texture. Meanwhile, transfer the saved fat to a separate small frying pan for the next step.
Rendering Chicken Oil and Slow-Frying
Place the weighted pan with the chicken skin over medium-low heat. At the same time, heat the small pan with the saved fat over high heat starting from cold. As it heats up, the fat will melt, rendering into a beautiful golden chicken oil (schmaltz). The solid bits won't melt completely; instead, they turn into crispy, fragrant pieces. Strain through a sieve to separate the crispy bits from the liquid oil. Meanwhile, fry the main chicken skin slowly for about 5 minutes. Occasionally, use a towel to protect your hand and press down firmly on the plate to squeeze out more moisture and fat. Once the bottom is golden brown and crispy, flip it over, replace the foil and plate, and fry the other side for another 5 minutes.
Final Seasoning and the Secret Ingredient
Once both sides are completely crispy, drain the rendered chicken oil from the pan. While the chicken skin is piping hot, sprinkle with salt, pepper, and chicken bouillon powder. If you season too early, the spices will wash away with the rendering fat, so seasoning right after cooking is an absolute rule. Finally, press down with the back of a ladle to distribute the flavor. Some recipes call for coating the skin in flour or starch, but our chef dismisses that as unnecessary. As long as you parboil and remove the fat properly, you'll get a perfect crunch without any flour. The real secret to deliciousness is 'imagining you've worked at a traditional restaurant for 20 years'—with enough imagination, you'll even have the peace of mind to serve it on fancy tempura paper.
Crispy Chicken Skin Salad & Dressing
Using the reserved crispy bits and chicken oil, we'll also make an amazing Chicken Skin Salad. First, microwave 30ml of mirin to evaporate the alcohol, then add 1 tbsp rice vinegar, lemon juice, soy sauce, and bonito flakes to make a special 'homemade ponzu.' Mix this ponzu with the rendered chicken oil, sugar, and garlic to create an incredibly rich dressing. Arrange torn lettuce or your favorite shredded vegetables in a bowl, scatter the crispy chicken bits, and crumble the crispy chicken skin on top. Garnish with chopped green onions and drizzle with the special dressing. This salad is so delicious you could eat a whole bucket of it, making it the perfect snack or appetizer.
About 夕方食堂

夕方食堂
34.3万人 subscribers ・ 家庭料理
* Opens YouTube channel
* Subscriber count is as of article creation and may differ from the current number.
