
Recipe
No-Fry Chicken Katsu! How to Make Pan-Seared Chicken Katsu (Crispy with Just 3 tbsp Oil & Flavorful Soy Seasoning)
Ingredients
- 1chicken breast (approx. 300g)
- 2tbsp flour
- 1beaten egg
- Justunder 1 cup panko breadcrumbs
- 2tbsp + 2 tsp vegetable oil
- [A]2 tsp sake
- [A]2 tsp soy sauce
- [A]1/2 tsp grated ginger
- Mizunagreens, to taste
- [B]1 tsp sesame oil
- [B]A pinch of salt
- Redpickled ginger (beni shoga), to taste
- Japanesehot mustard (karashi), to taste
About "Pan-Seared Chicken Katsu (Chicken Breast)"
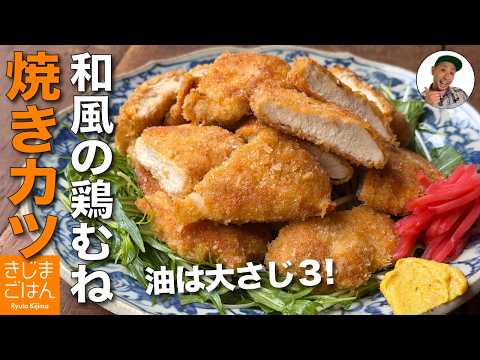
This pan-seared chicken katsu uses just one chicken breast and is cooked in a skillet with less than 3 tbsp of oil. Well-seasoned with soy sauce, sake, and grated ginger for a karaage-style flavor, it is delicious enough to eat as-is without any sauce. The key secrets to achieving a crispy exterior and juicy interior include cutting the meat perpendicular to the grain to ensure even thickness, letting the breaded chicken rest for 5 minutes, and starting in a cold pan. It is served with a side of mizuna greens tossed in sesame oil and salt, accompanied by red pickled ginger and hot mustard for a cohesive Japanese flavor profile.
Introduction to きじまごはん 【料理家きじまりゅうた公式チャンネル】 →
Video Timestamps
Tips for Making "Pan-Seared Chicken Katsu (Chicken Breast)"
-
Prep (Cutting)
- Since the grain of chicken breast radiates from the center, first cut it in half lengthwise along the grain boundary, then slice diagonally against the grain. Aim for 4 pieces from the larger half and 2 from the smaller half, butterflying any uneven parts to ensure uniform thickness.
-
Seasoning
- Place the chicken in a plastic bag with 2 tsp soy sauce, 2 tsp sake, and 1/2 tsp grated ginger. Massage well and let sit for 5 minutes. This deep, karaage-style seasoning eliminates the need for any dipping sauce.
-
Breading
- Add flour to the bag of marinated chicken in two batches and shake to coat. Use a fork to lift each piece, dip it in the beaten egg, and press the panko firmly onto it. This keeps your hands clean throughout the process.
-
Resting Breading
- Let the breaded chicken rest for 5 minutes before cooking. This allows the egg's moisture to hydrate the panko, securing the breading to the meat so it doesn't fall off and cooks up extra crispy.
-
Cooking Method
- Use a cold start: arrange the chicken in a cold pan with 2 tbsp of vegetable oil, then turn the heat to medium. Once sizzling, reduce to medium-low and cook for 3 minutes per side. Add 2 tsp of oil around the edges if the pan runs dry.
-
Finishing
- Let the cooked chicken katsu rest on a wire rack for about 30 seconds before slicing. This locks in the juices and keeps the meat flavorful and moist.
-
Side Salad
- Cut the mizuna greens into 5 cm pieces and toss with 1 tsp of sesame oil and a pinch of salt just before serving. It pairs beautifully with the Japanese-style chicken katsu, served alongside red pickled ginger and hot mustard.
Ingredients for "Pan-Seared Chicken Katsu (Chicken Breast)"
13 items* Tap ingredient names to find on Amazon
- 1chicken breast (approx. 300g)
- 2tbsp flour
- 1beaten egg
- Justunder 1 cup panko breadcrumbs
- 2tbsp + 2 tsp vegetable oil
- [A]2 tsp sake
- [A]2 tsp soy sauce
- [A]1/2 tsp grated ginger
- Mizunagreens, to taste
- [B]1 tsp sesame oil
- [B]A pinch of salt
- Redpickled ginger (beni shoga), to taste
- Japanesehot mustard (karashi), to taste
How to Make "Pan-Seared Chicken Katsu (Chicken Breast)"
- 1
Wipe off any excess moisture from the chicken breast with a paper towel and remove the skin.
- 2
Cut the chicken breast in half lengthwise along the boundary of the grain. Slice the smaller piece diagonally against the grain into 2 pieces, and the larger piece into 4 pieces. For any parts with uneven thickness, butterfly them by holding the knife flat to slice open, ensuring an even thickness throughout.
- 3
Place the chicken in a plastic bag, add the [A] ingredients (2 tsp sake, 2 tsp soy sauce, and 1/2 tsp grated ginger), massage well through the bag to coat, and let sit for about 5 minutes.
- 4
Chop the mizuna greens into 5 cm (approx. 2-inch) pieces (do not toss them with the seasoning until just before serving).
- 5
Prepare just under 1 cup of panko breadcrumbs in a tray, pushing them to one side. Prepare 1 beaten egg and 2 tbsp of flour in separate containers.
- 6
After 5 minutes, once the chicken has absorbed the liquid, add half of the flour (about 1 tbsp) to the bag and shake to coat. Add the remaining flour and mix lightly.
- 7
Using a fork, lift the chicken pieces one by one, dip them in the beaten egg, and transfer them to the panko tray. Press the panko firmly onto the chicken to coat. Once all pieces are breaded, let them rest for 5 minutes.
- 8
Pour 2 tbsp of vegetable oil into a cold frying pan and spread it around. Arrange the breaded chicken in a single layer without overlapping. Turn the heat to medium. Once you hear a sizzling sound, reduce the heat to medium-low and cook for about 3 minutes on one side.
- 9
Once beautifully browned, flip the chicken and cook for another 3 minutes. If the pan runs out of oil during cooking, drizzle 2 tsp of vegetable oil around the edges of the pan and swirl to distribute.
- 10
Transfer the cooked chicken katsu to a wire rack, let it rest for about 30 seconds, and then cut into bite-sized pieces.
- 11
Toss the mizuna greens with 1 tsp of sesame oil and a pinch of salt. Arrange the mizuna on a plate, top with the chicken katsu, and serve with red pickled ginger and hot mustard on the side.
Detailed Commentary on "Pan-Seared Chicken Katsu (Chicken Breast)"
* Content organized by topics from the video.
Cutting Techniques for Chicken Breast Grain
Prepare one chicken breast (around 300g) for the chicken katsu. First, thoroughly wipe off any moisture with a paper towel and remove the skin. The ultimate secret to keeping chicken breast tender is understanding the direction of the grain and cutting perpendicular to it. Since the fibers of chicken breast radiate outward from the center like a leaf, start by cutting the breast in half lengthwise along the boundary of the grain. Slice the smaller piece diagonally against the grain into 2 pieces, and the larger piece into 4 pieces. If the thickness is uneven, butterfly those sections by holding your knife flat to slice them open. Ensuring an even thickness allows the chicken to cook uniformly, preventing it from drying out and keeping it tender and juicy.
Karaage-Style Seasoning: No Sauce Needed
Chef Kijima's pan-seared chicken katsu is incredibly flavorful and delicious even without any sauce. The secret lies in the savory, Japanese karaage-style marinade. To minimize cleanup, we make full use of a plastic bag. Add 1/2 tsp of grated ginger, 2 tsp of soy sauce, and 2 tsp of sake directly into the bag, then add the sliced chicken breast. Massage well through the bag to distribute the seasonings evenly. Let it sit for about 5 minutes to allow the flavors to meld. By letting the meat absorb the moisture and seasonings, it stays juicy and tender when cooked, rather than turning dry.
Preparing the Side Salad and Breading
While the chicken is marinating, prepare the side salad and the breading ingredients. Instead of the traditional shredded cabbage, this recipe features fresh mizuna greens. Cut the mizuna into 5 cm pieces and toss them with sesame oil and salt right before serving; this simple salad pairs beautifully with the Japanese-flavored chicken katsu. Additionally, serving hot mustard (karashi) and red pickled ginger (beni shoga) on the side adds a sharp, refreshing kick that makes this dish perfect with both rice and drinks. For the breading, prepare 2 tbsp of flour, 1 beaten egg, and just under 1 cup of panko breadcrumbs. Pushing the panko to one side of the tray is a handy trick to make the breading process go smoothly.
Mess-Free Breading with a Bag and Fork
Breading food can often leave your hands sticky and messy. This recipe introduces an innovative technique using a bag and a fork to keep your hands completely clean. After 5 minutes, once the chicken has absorbed the liquid, add half of the flour (about 1 tbsp) to the bag and shake to coat. Then, add the remaining flour and mix lightly until just a bit of powdery texture remains. Now, use a fork to lift each piece of chicken, dip it in the beaten egg, and transfer it to the panko tray. Gently but firmly press the panko onto the chicken with your hands, then move the breaded piece to a 'safe zone' in the tray. This method allows you to work with one hand, keeping both your hands and your kitchen clean.
Rest for 5 Minutes for Extra Crispiness
While you might want to cook the chicken immediately after breading, letting it rest for 5 minutes is a crucial Kijima-style step. Resting allows the moisture from the egg to fully hydrate the panko, binding the breading firmly to the meat. This prevents the breadcrumbs from falling off in the pan and results in an incredibly crispy texture. Chef Kijima mentions that since his home kitchen is quite small, he is always researching space-saving, mess-free, and delicious cooking methods like this.
Cold Start and Pan-Searing with Minimal Oil
Since this is a 'no-fry' chicken katsu, it uses less than 3 tbsp of oil in total, making it a very healthy option. The key to a perfect finish is a 'cold start'—placing the meat in a cold pan with oil before turning on the heat. Pour 2 tbsp of vegetable oil into the pan, spread it around, and arrange the breaded chicken in a single layer without overlapping. Turn the heat to medium. Once you hear a sizzling sound, reduce the heat to medium-low and cook for about 3 minutes. Flip the pieces and cook for another 3 minutes. If the pan runs dry as the panko absorbs the oil, drizzle 2 tsp of vegetable oil around the edges of the pan. Even with minimal oil, you will get an amazingly crunchy crust.
Tasting the Juicy Pan-Seared Chicken Katsu
Once cooked, transfer the chicken katsu to a wire rack and let it rest for about 30 seconds before slicing. This locks in the juices so they don't escape when cut. Slicing into the katsu produces a wonderful crunching sound, revealing a moist and tender interior. Arrange the seasoned mizuna greens on a plate, top with the katsu, and serve with hot mustard and red pickled ginger. Despite being cooked with less than 3 tbsp of oil, the crust is incredibly crispy and the meat is remarkably juicy. The soy-based seasoning is so flavorful that you don't need any sauce—just a bit of mustard and pickled ginger is enough to make it absolutely irresistible.
About きじまごはん 【料理家きじまりゅうた公式チャンネル】
きじまごはん 【料理家きじまりゅうた公式チャンネル】
14.7万人 subscribers ・ 家庭料理
* Opens YouTube channel
* Subscriber count is as of article creation and may differ from the current number.
