

Recipe
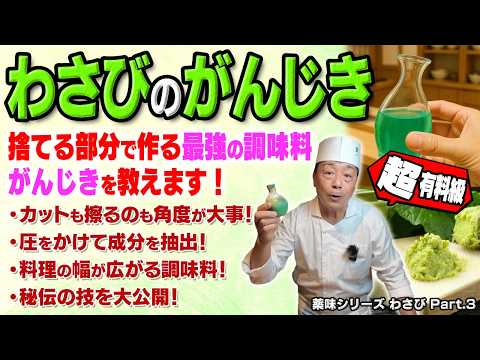
Turning Wasabi Leaves & Stems into the Ultimate Condiment: Chef's Master Class on 'Wasabi no Ganjiki' | Wasabi Part 3
Ingredients
- Realwasabi (Mazuma or Misho variety), to taste
- Salt,a pinch
- Tamasake(equal parts boiled water and sake, cooled), to taste
- Water,to taste
About "Wasabi no Ganjiki"
Made from real wasabi leaves and stems, Wasabi no Ganjiki is prepared by slicing the fibers at a right angle. Through salting, cloth-tapping, pressurized hot-water bathing in a sake carafe (tokkuri), and rapid ice-water cooling, you create a long-lasting condiment extract that retains its aroma. Perfect for sushi, soba, and ohitashi, this is a master chef's secret you can recreate at home.
Tips for Making "Wasabi no Ganjiki"
-
Prep
- Understand the differences between Mazuma (red stem) and Misho (green stem) wasabi, and use them accordingly.
-
Chopping
- Chop perpendicular to the wasabi fibers to maximize both umami and spiciness.
-
Heating
- Leave 40% headspace in the carafe and seal tightly with wrap and foil to build pressure during the water bath.
-
Timing
- Aim for a 6 to 7-minute water bath, adjusting based on the wasabi variety and quantity.
-
Cooling & Storage
- Cool rapidly in ice water and rest for half a day to a day to lock in the volatile aroma and heat.
Ingredients for "Wasabi no Ganjiki"
4 items* Tap ingredient names to find on Amazon
How to Make "Wasabi no Ganjiki"
- 1
Wash the wasabi and cut off the stems
Gently wash the real wasabi with a sasara brush while checking the differences between the varieties. The Mazuma variety may have some blemishes but is highly durable, while the Misho variety has green stems and is more affordable. Snap and cut off the stems.
- 2
Finely chop the stems at a right angle
Cut the snapped stems in half, then chop them very finely from the end. The key is to position the knife at a right angle to the fibers, which maximizes the unique umami and spiciness of the wasabi. You can tell the difference between the wasabi varieties by the wateriness and texture of the chopped stems.
- 3
Sprinkle salt to stimulate the stems
Transfer the chopped stems to a strainer and sprinkle a very small pinch of salt. This salt is not for seasoning, but to gently stimulate the raw ingredients. Use just enough to look like a light drizzle, mix lightly, and let sit for 2 to 3 minutes until the wasabi begins to sweat.
- 4
Tap with a cloth to remove moisture and activate heat
Spread the salted stems onto a damp cloth that has been wrung out tightly, and cover with another damp cloth. Lightly tap with the back of a knife in vertical, horizontal, and diagonal directions to stimulate them. The excess moisture is absorbed by the cloth, activating the spiciness of the wasabi and completing the base for the ganjiki.
- 5
Place stems and tamasake in a sake carafe and seal
Place the stimulated stems into a sake carafe (tokkuri) and pour in the tamasake (equal parts boiled water and sake). Crucially, leave about 40% empty space inside the carafe. If filled to the top, pressure won't build during heating, preventing the spiciness from being fully extracted. Cover the mouth of the carafe with 3 to 4 layers of plastic wrap, tie tightly with a rubber band, and reinforce by wrapping tightly with aluminum foil.
- 6
Heat in a hot water bath
Place the prepared carafe into a pot of hot water on the stove. The water does not need to boil vigorously; a gentle simmer is sufficient. Submerge the carafe and occasionally rotate it. The heating time is generally about 6 to 7 minutes, but since it varies depending on the amount and type of wasabi (red or green stem), it is important to gain experience and get a feel for it.
- 7
Chill rapidly in ice water and let rest
Once heated, immediately submerge the carafe in ice water to cool it rapidly. Never remove the plastic wrap or aluminum foil sealing the mouth during this process. After rapid cooling, let it rest in a cold place for half a day to a full day.
- 8
Strain to complete
After letting it rest sufficiently, finally open the seal and strain the contents through a strainer lined with a paper towel. The stems themselves have lost all their heat and color, so they are discarded. The beautiful cobalt-green liquid strained out is the completed 'Wasabi no Ganjiki' extract.
- 9
Use according to your needs
The completed 'Wasabi no Ganjiki' is characterized by its long-lasting aroma. It can be used in various Japanese dishes, such as a soaking liquid for ohitashi, a filling for sushi rolls, or sprayed with a mister over bukkake soba. The spiciness and flavor last longer than raw grated wasabi, keeping takeout sushi delicious.
Food Science
Moisture control through salting removes excess water and grassy odors, bringing out a crisp texture. Additionally, finely chopping and applying heat activates the intracellular enzyme myrosinase, promoting the generation of allyl isothiocyanate, the compound responsible for wasabi's signature sharp spiciness. This creates a perfect harmony between the extracted heat, the saltiness, and the subtle sweetness and umami of the tamasake.
Detailed Commentary on "Wasabi no Ganjiki"
* Content organized by topics from the video.
Mazuma vs. Misho Wasabi Characteristics
The chef washes the real wasabi with a sasara brush while explaining the differences between the two varieties. On the right is the affordable Misho variety (green stem), and on the left is the premium Mazuma variety (red stem). When scrubbed, the surface of the Misho variety can scrape off and fray, whereas the Mazuma variety, grown slowly in cold climates, is extremely durable and won't scrape away despite having some blemishes. The chef notes, 'It's not about which is better; they are both wonderful ingredients to use depending on the purpose.' While tube wasabi is convenient for home use, this video shares the chef's dedication to turning wasabi leaves and stems into the 'ultimate condiment' without waste.
Why Chop Stems at a Right Angle
When cutting off the stems, the Mazuma variety snaps cleanly, while the Misho variety has tough fibers that are harder to break. The chef cuts the stems roughly in half, then chops them extremely finely from the end, keeping the knife at a right angle. This 'right angle' is the most crucial point; just like grating wasabi, cutting perpendicular to the fibers maximizes its unique umami and spiciness. Comparing the chopped stems, the Misho variety is watery like a cucumber, while the Mazuma variety has a firm texture and is delicious enough to eat on its own.
Stimulating Stems with Salt and Tapping
Transfer the chopped stems to a strainer and sprinkle a tiny pinch of salt. This is not for seasoning, but to give a gentle shock to the raw ingredient. The chef describes the amount as 'like a light drizzle.' After mixing lightly and letting it sit for 2 to 3 minutes, the wasabi begins to sweat. Next, spread the stems on a cloth that has been dampened and wrung out tightly, cover with another cloth, and tap gently with the back of a knife. Tapping from vertical, horizontal, and diagonal angles stimulates the wasabi, while the cloth absorbs excess moisture, activating the heat to complete the ganjiki base.
Pressurizing with a Carafe and Tamasake
Place the stimulated stems into a sake carafe (tokkuri) and pour in tamasake (equal parts boiled water and sake). The most critical step here is to leave about 40% empty space inside the carafe. If filled to the brim, pressure won't build during heating, and the heat won't extract properly. The chef advises to 'think of it like a pressure cooker.' Cover the mouth of the carafe with 3 to 4 layers of plastic wrap, tie tightly with a rubber band, and reinforce it securely with aluminum foil. Since plastic wrap alone can expand and burst, causing burns, the foil reinforcement is absolutely essential.
Hot Water Bath and Timing Adjustments
Place the prepared carafe into a hot water bath on the stove. The water doesn't need to boil vigorously; a gentle simmer is plenty. Submerge the carafe, occasionally rotating it. The heating time varies depending on the amount and type of wasabi (red or green stem), but the chef's experience suggests about 6 to 7 minutes as a guide. The chef explains, 'You can't give an exact time; it's important to gain experience and get a feel for it.' Because the foil holds everything securely during heating, the liquid inside won't leak, allowing pressure to build safely.
Ice Water Cooling and Extract Completion
Once heated, immediately submerge the carafe in ice water to cool it rapidly. Never remove the plastic wrap or aluminum foil sealing the mouth during this step. After rapid cooling, let it rest in a cold place for half a day to a full day. Once rested, finally open the seal and strain the contents through a strainer lined with a paper towel. At this stage, the stems have lost all their heat and color, so they are discarded. The beautiful cobalt-green liquid left behind is the 'Wasabi no Ganjiki' extract, which the chef proudly calls the 'ultimate condiment.'
Pro Tips for Using Wasabi no Ganjiki
While freshly grated wasabi loses its aroma and heat over time, this 'Wasabi no Ganjiki' extract is highly resistant to losing its spiciness. The chef demonstrates techniques like using it as a soaking liquid for ohitashi, a filling for sushi rolls, or spraying it with a mister over bukkake soba. This keeps the spiciness and flavor alive much longer than applying wasabi directly to sushi rice, preserving the taste even for takeout sushi. The chef concludes, 'Wasabi leaves are not meant to be thrown away. Mastering this technique will dramatically expand your culinary repertoire.'
About 大将に聞いてみた!
大将に聞いてみた!
2.1万人 subscribers ・ 日本料理・和食
* Opens YouTube channel
* Subscriber count is as of article creation and may differ from the current number.
