

Recipe
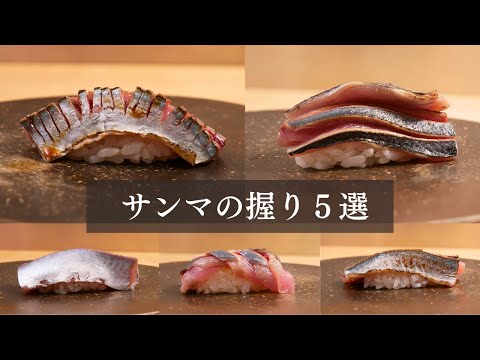
5 Ways to Make Pacific Saury Nigiri: How One Cut Changes Everything
Ingredients
- Pacificsaury (several fish)
About "5 Types of Pacific Saury Nigiri Sushi"
Learn how to create 5 types of nigiri sushi using Pacific saury simply by changing the slicing technique. We cover meticulous prep work including scaling, gutting, Daimyo-oroshi (filleting), and deboning, followed by odor removal in ice-cold saltwater and aging. Then, we explore different presentations using methods like searing, bone-cutting (honekiri), and layered nigiri. These Edomae sushi techniques can also be applied to other blue-backed fish like sardines and horse mackerel.
Introduction to 蒼の鮨 sushi-chef ao →
Tips for Making "5 Types of Pacific Saury Nigiri Sushi"
-
Prep
- Removing the pelvic fins with shears prevents them from catching during Daimyo-oroshi.
-
Prep
- For Daimyo-oroshi, slide the knife along the backbone, focusing on the feel of the blade pressing against the bone.
-
Prep
- Debone quickly to prevent your body heat from transferring to the fish.
-
Odor Removal
- Soak in 3% ice-saltwater for 7 minutes to draw out odors via osmosis, then age in the fridge for 30 minutes for a glossy finish.
-
Odor Removal
- Thoroughly wiping off moisture extends the shelf life of the fish.
-
Slicing
- Make a deep center slit; otherwise, the fish won't open up beautifully when shaped.
-
Bone-Cutting
- Making fine vertical cuts severs tiny bones, softening the texture and ensuring a pleasant bite.
-
Shaping
- Skin-on saury can slip if squeezed too hard; cradle and mold it gently.
-
Layered Nigiri
- Apply slightly more pressure on the sides when molding to keep the layered pieces intact.
Ingredients for "5 Types of Pacific Saury Nigiri Sushi"
1 items* Tap ingredient names to find on Amazon
- Pacificsaury (several fish)
How to Make "5 Types of Pacific Saury Nigiri Sushi"
- 1
Remove the scales from the surface of the Pacific saury.
- 2
Cut off the head, and open the belly from the vent using a reverse knife technique.
- 3
Scrape out the viscera with the knife and score the membrane over the bloodline.
- 4
Rinse with water to clean the cavity.
- 5
Thoroughly wipe off any moisture, and cut off the pelvic fins with kitchen shears.
- 6
Slice along the belly side first, just like starting a standard three-piece fillet.
- 7
Perform Daimyo-oroshi by sliding the knife along the backbone.
- 8
Slide the knife along the other side in the same manner.
- 9
Trim the belly bones by sliding the knife to shape the fillet.
- 10
Remove the pin bones using fish tweezers.
- 11
Submerge the fish in a 3% ice-cold saltwater bath for 7 minutes.
- 12
Drain in a strainer and carefully pat dry with paper towels.
- 13
Place on a tray and let it age in the refrigerator for 30 minutes.
- 14
Cut the fish into the desired size for nigiri toppings.
- 15
Style 1 (Seared Nigiri): Make a deep slit down the center, lightly sear the surface, and shape into nigiri.
- 16
Style 2 (Honekiri Nigiri): Make a center slit, turn the fish horizontally, make fine vertical cuts to sever tiny bones, sear the surface, and shape into nigiri.
- 17
Style 3 (Layered Nigiri): Make vertical slits on two pieces of equal size, sear them, layer them together, and shape into nigiri.
Food Science
Soaking the fish in a 3% saltwater bath draws out excess moisture through osmotic pressure, firming up the flesh and concentrating its umami. Resting it in the refrigerator allows autolytic enzymes to break down proteins, increasing the level of amino acids, which are key umami components. Additionally, searing the surface triggers the Maillard reaction, adding a savory, smoky aroma that scientifically elevates the deliciousness of the Pacific saury.
Detailed Commentary on "5 Types of Pacific Saury Nigiri Sushi"
* Content organized by topics from the video.
The Appeal of Saury: Transformed by the Cut
Today, we will explore 5 different styles of Pacific saury nigiri. As you can see in the video, simply changing the way we slice the fish makes each piece look completely different. Even with the exact same Pacific saury, slight variations in cutting and preparation yield entirely different appearances and flavors. This technique can also be applied to other blue-backed fish like sardines, horse mackerel, and mackerel, so mastering this will greatly expand your sushi-making repertoire. Let's get started!
Meticulous Prep and Fin Removal
First, let's prepare the Pacific saury. Since this video focuses mainly on the 5 different slicing techniques, I will keep the prep explanation relatively brief. Start by removing the scales from the surface of the Pacific saury. Next, cut off the head and open the belly from the vent using a reverse knife technique. Scrape out the viscera with your knife and score the membrane over the bloodline. Then, rinse it. Since rinsing is just cleaning out the cavity like with any other fish, we'll skip that part. Now, thoroughly dry the Pacific saury, making sure to wipe inside the belly cavity as well. Here is a key tip: cut off the pelvic fins with kitchen shears. These fins often get caught during Daimyo-oroshi (filleting), so it is safest to remove them beforehand.
Daimyo-Oroshi and Careful Deboning
Next, slice along just the belly side, similar to starting a three-piece fillet. I have taught Pacific saury filleting in cooking classes before, and in my experience, this is the method that students succeed with most. That is why I recommend this approach in the video. Slide your knife along the backbone. Daimyo-oroshi is a filleting technique where you slide the knife directly along the backbone. Even if you slide it a bit roughly, the bone won't break, so focus on the sensation of the knife firmly pressing against the backbone as you slide it. Repeat the same process on the other side. Now, clean the cutting board. Next, we will remove the belly bones. Since the belly bones run long vertically, slide your knife to trim them off while shaping the fillet. Finally, we'll debone the fish. Honestly, this is the most tedious part. Work quickly to prevent your body heat from transferring to the Pacific saury.
Ice-Saltwater Bath and Aging
Once deboned, we will draw out any fishy odor from the Pacific saury. Prepare some ice water and add 3% salt. Submerge the Pacific saury in this bath to draw out the odor through osmotic pressure. Let it sit for 7 minutes. After 7 minutes, transfer the fish to a strainer to drain. Pat the moisture dry. If you can't get it completely dry in one go, use paper towels and wipe it multiple times. Any remaining moisture can cause spoilage, so this is a crucial step for extending shelf life. To let the flesh settle after the ice-saltwater bath, place the Pacific saury on a tray and store it in the refrigerator for 30 minutes. After 30 minutes, you'll notice the flesh looks slightly glossy and the color has shifted. There are several reasons for this, but primarily, the brief aging process coaxes the fat to the surface, giving the flesh a beautiful sheen.
Classic Searing and the First Nigiri
Now, let's move on to the highly anticipated 5 styles of nigiri. First, cut the Pacific saury into the size of your desired sushi toppings. The head and tail ends are slightly irregular in shape, so trim them to neaten the pieces. As we go through the 5 styles, you might notice the steps in the video are slightly out of chronological order. I have grouped the process from slicing to preparation and shaping for each individual style to make it easier to follow. This structure makes the flow much clearer, so please keep that in mind as you watch. Let's start with the first style: a simple nigiri. For the slice, make a firm cut down the center of the Pacific saury. The key here is to make the cut relatively deep. If it is too shallow, the Pacific saury won't open up beautifully when shaped, making it very difficult to mold. Keep that in mind. Since this style is seared, we will lightly torch the surface first. We are using skin-on Pacific saury here. If you squeeze too hard, the skin will slip, so the key is to mold it gently, cradling the fish. The first style of nigiri is complete. This is the most classic style.
Style 2: Honekiri (Bone-Cutting) Nigiri
Next, let's look at the second style of nigiri. Just like before, start by making a single slit down the center of the Pacific saury. Then, turn the fish horizontally and make fine vertical cuts. The key here is to make as many cuts as possible. Pacific saury has many tiny bones that can be difficult to remove completely during the deboning stage. Making these fine cuts severs any remaining tiny bones—a technique known as honekiri (bone-cutting). This softens the texture and ensures a pleasant eating experience even if a tiny bone remains. Now, sear the surface just like the first style, and shape it with precision. The second style of nigiri is complete. The fine cuts give it a beautiful, intricate look, making it an elegant, artisanal piece of sushi.
Style 3: Layered Nigiri for Volume
Now, let's move on to the third style. This style often utilizes the tail end of the fish, which can be too small on its own to provide enough volume. To solve this, we use a layered nigiri technique. Shaping a single small piece doesn't look very appealing, so prepare two pieces of Pacific saury of the same size. Trim the tips slightly to neaten the shape. Make vertical slits in the same manner as before. Once sliced, sear the toppings. We will layer the two pieces of Pacific saury together to shape the nigiri. Molding them this way wraps the fish beautifully around the rice, creating an elegant silhouette. The key is to apply slightly more pressure on the sides to wrap it snugly. This keeps the shape intact and neat. The third style of nigiri is complete. This is a great technique to use when you want to make the most of smaller trim pieces.
Styles 4 & 5: Skinless and Trim Pieces
Now for the fourth style of nigiri. For this one, we will peel off the skin. Starting from the head end, use the handle or spine of your knife to gently push and peel the skin away. Using a knife rather than peeling by hand keeps the beautiful silver skin (gin-hada) intact, so hand-peeling is not recommended. Cut it to nigiri size and make a slit down the center. Let's shape it. Since this style is not seared, the silver color of the Pacific saury stands out brilliantly. However, because it isn't seared, any bitterness or fishiness is more noticeable, making this a delicate style that requires exceptionally fresh Pacific saury. The fourth style of nigiri is complete. A quick rinse with vinegar can also help remove any odor and enhance the flavor. Finally, let's look at the fifth style. This method is perfect when you only have tail ends left or irregular pieces. Slice the remaining trim into small, thin pieces and layer them together to form a single topping. Layering them this way allows you to shape a neat piece of sushi while minimizing waste. While rarely seen in high-end restaurants, it is a highly practical technique for using ingredients efficiently. The fifth style of nigiri is complete. Layering the pieces makes it a bit challenging to mold, but it results in a beautiful piece of sushi.
About 蒼の鮨 sushi-chef ao

蒼の鮨 sushi-chef ao
3.2万人 subscribers ・ 和食/寿司
* Opens YouTube channel
* Subscriber count is as of article creation and may differ from the current number.
