

Recipe
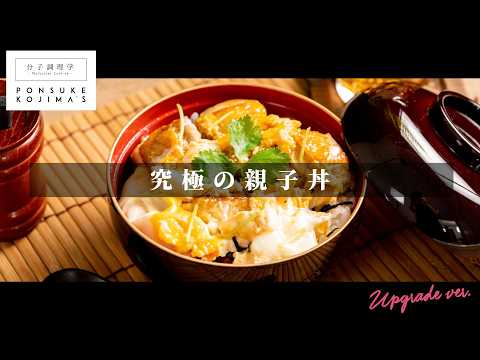
Over 350 Reviews! Turn Supermarket Chicken into Premium Poultry: The Ultimate Oyakodon
Ingredients
- 1chicken thigh
- 1/2onion
- 3eggs
- 2tbsp sake
- 2tbsp mirin
- 1tbsp soy sauce
- 1tbsp sugar
- 1tsp dashi powder
- 100ml water (or more)
- 1tbsp vegetable oil
About "Oyakodon (Chicken and Egg Bowl)"
This ultimate Oyakodon transforms ordinary supermarket chicken by searing it to trigger the Maillard reaction, sautéing the onions before simmering to draw out their sweetness, and adding the eggs in two stages for the perfect soft, runny texture. By precisely controlling the heat from a molecular gastronomy perspective, you can recreate the deep, rich flavor of premium free-range chicken.
Introduction to こじまぽん助【分子調理学研究家】 →
Video Timestamps
Tips for Making "Oyakodon (Chicken and Egg Bowl)"
-
Heat Control
- Sear the chicken skin-side down over high heat to trigger the Maillard reaction, concentrating the flavor of supermarket chicken.
-
Prep
- Avoid overmixing the eggs; a light whisk keeps a beautiful contrast of whites and yolks and ensures a creamy texture.
-
Cooking Process
- Sauté the onion before simmering to control its texture and sweetness, and cook the chicken separately to prevent overcooking.
-
Timing & Heat
- Pour the egg in two stages: let the first layer set, then add the second over low or no heat for a perfect runny finish.
-
Seasoning
- Always taste and adjust the sauce after returning the chicken and before adding the eggs, as you cannot adjust it later.
Ingredients for "Oyakodon (Chicken and Egg Bowl)"
10 items* Tap ingredient names to find on Amazon
How to Make "Oyakodon (Chicken and Egg Bowl)"
- 1
Prep the Chicken and Onion
Cut the chicken thigh into bite-sized pieces and slice the onion into 1cm-wide wedges.
- 2
Whisk the Eggs
Crack 3 eggs into a bowl and whisk them roughly by moving your chopsticks back and forth. Aim for a 'half-mixed' state where the whites and yolks are not completely combined, just lightly breaking up the egg whites.
- 3
Sear the Chicken
Heat 1 tbsp of vegetable oil in a pan over high heat. Once hot, place the chicken thigh pieces skin-side down. Press down gently with chopsticks to ensure even contact and sear until the skin is beautifully browned. Turn off the heat, flip the chicken, and let it warm in the residual heat for about 1 minute. Transfer the chicken to a tray and wrap with aluminum foil to keep warm.
- 4
Adjust the Oil in the Pan
Lightly wipe away the excess chicken fat in the pan with a paper towel, leaving a small amount behind to retain the savory umami flavor.
- 5
Sauté the Onion
Add the onion to the pan and sauté over medium heat until lightly browned. This coaxes out the sweetness while keeping a pleasant, crisp texture.
- 6
Simmer the Onion
Once the onion is lightly browned, add 2 tbsp of sake and 2 tbsp of mirin. Bring to a boil to cook off the alcohol. Next, add 1 tbsp of soy sauce, 1 tsp of dashi powder, 100 ml of water, and 1 tbsp of sugar. Simmer until the onion reaches your desired tenderness.
- 7
Return the Chicken to the Pan
Once the onion is cooked to your liking, return the seared chicken to the pan skin-side up. Simmer over low heat for about 1 minute to cook the chicken through to the center.
- 8
Taste the Simmering Sauce
Always taste the sauce before adding the eggs. Adjust with water if it is too salty. Since you cannot adjust the flavor after adding the eggs, make sure it is perfect at this stage.
- 9
Add the First Pour of Egg
Using a measuring cup with a spout, pour in about two-thirds of the beaten egg in a circular motion. Do not touch it with chopsticks; let it cook gently. Leaving it undisturbed prevents the egg from turning cloudy and soupy.
- 10
Add the Second Pour of Egg
Once the first pour of egg has set, reduce the heat further or turn it off. Pour in the remaining egg and let the residual heat cook it to a creamy, soft-boiled finish.
- 11
Assemble and Serve
Gently slide the chicken and egg mixture over a bowl of warm rice. Garnish with mitsuba (Japanese wild parsley) to finish.
Food Science
Combining the inosinate (umami) in chicken with the glutamate (umami) in dashi and soy sauce creates a powerful umami synergy. Additionally, the sweetness of sugar and mirin balances beautifully with the saltiness and umami of soy sauce, harmonizing the five basic tastes. Finally, heating the eggs to the precise temperature for a soft-boiled state allows the proteins to coagulate gently, yielding a smooth mouthfeel and rich flavor.
Detailed Commentary on "Oyakodon (Chicken and Egg Bowl)"
* Content organized by topics from the video.
3 Steps to the Ultimate Oyakodon
Today's recipe is the 'Ultimate Oyakodon,' an upgraded version of our highly popular recipe with over 350 reviews. While Oyakodon seems simple, controlling the heat to achieve the perfect runny egg texture while fully cooking the chicken can be surprisingly difficult. To solve this, we look at it through the lens of molecular cooking science and break down the process into three foolproof keys: 1) searing the chicken skin-side down, 2) sautéing the onions before simmering, and 3) adding the eggs in two separate stages. Combining these three approaches transforms ordinary supermarket chicken into a dish with the deep, rich flavor of premium free-range poultry.
The Secret to Whisking Eggs: Don't Overmix
We start by prepping the eggs. While the video shows this step first for filming purposes, at home, it is best to whisk the eggs right before pouring them into the pan. We use three eggs for this recipe. The biggest secret to achieving the ultimate texture is to avoid overmixing. If the whites and yolks are completely blended, you lose both the creamy texture and the beautiful contrast of white and yellow. Move your chopsticks back and forth to lightly break up the egg whites, aiming for a 'half-mixed' sweet spot. This simple technique creates a texture that everyone instinctively finds delicious.
Searing Chicken Skin for the Maillard Reaction
Next, we prep and sear the chicken. Heat 1 tbsp of vegetable oil in a pan over high heat, then arrange one bite-sized chicken thigh skin-side down. As chicken cooks, the skin tends to shrink and curl. Gently press down with chopsticks to ensure even contact with the pan for a beautiful, uniform sear. Searing the skin until crispy triggers the Maillard reaction. This chemical reaction between amino acids and sugars creates a rich, savory aroma and deep flavor that elevates the entire dish.
Upgrading Supermarket Chicken to Premium Quality
There are two clear reasons why we sear the chicken first instead of simmering it from the start like traditional recipes. First, it prevents cooking failures. Even professional chefs find it difficult to perfectly sync the cooking times of onions and chicken, so cooking them separately guarantees the best results. Second, it maximizes the flavor of affordable supermarket chicken (broilers). Broilers are tender but can lack deep flavor due to short rearing periods. In contrast, premium free-range chicken (Jidori) has a firm texture and intense umami. By searing the broiler chicken first, we concentrate its flavors, replicating the rich depth of premium poultry while keeping the meat incredibly tender.
Sautéing Onions First for Perfect Texture
After searing the chicken on both sides and removing it, lightly wipe the pan with a paper towel, leaving a tiny bit of fat to preserve the chicken's umami. Next, sauté 1/2 of a sliced onion over medium heat. Sautéing first coaxes out the sweetness while retaining a pleasant bite. Once lightly browned, add 2 tbsp of sake and 2 tbsp of mirin, bringing it to a boil to cook off the alcohol. Then, add 1 tbsp of soy sauce, 1 tsp of dashi powder, 100 ml of water, and 1 tbsp of sugar. By adjusting the simmering time in this sauce, you can easily control the onion's texture to your exact preference, from crisp to melt-in-your-mouth soft.
Two-Stage Egg Pour for the Perfect Runny Finish
Once the onion reaches your desired texture, return the seared chicken to the pan skin-side up. Taste the sauce now and adjust with water if needed—this is your last chance to perfect the seasoning before adding the eggs. Reduce the heat to low and add the beaten eggs in two stages. Using a measuring cup with a spout makes this easy. Pour in about two-thirds of the egg first, and resist the urge to stir. Stirring makes the egg cloudy and soupy. Once the first layer sets, turn the heat down further or off completely, pour in the remaining egg, and let the residual heat create a luscious, velvety finish.
The Joy of Customizing Your Ultimate Bowl
Once the eggs are perfectly soft, gently slide the mixture over a bowl of warm rice and garnish with mitsuba to complete your 'Ultimate Oyakodon.' With your first bite, the savory, juicy chicken, sweet dashi-infused onions, and rich, velvety eggs will fill your mouth. The beauty of this recipe lies in its customizability—you can adjust the onion's crunch and the egg's runniness to your exact liking. True home cooking isn't just about replicating restaurant dishes; it's about finding the ultimate flavor profile for you and your family. We hope you enjoy crafting your very own ultimate Oyakodon at home!
About こじまぽん助【分子調理学研究家】
こじまぽん助【分子調理学研究家】
15.6万人 subscribers ・ 家庭料理
* Opens YouTube channel
* Subscriber count is as of article creation and may differ from the current number.
